Add a manual booking
Add a booking yourself — e.g. one taken over the phone — with a service, staff, time and client.
Not every appointment arrives online. A client phones, walks in off the street, messages you on Instagram — and you book it yourself. Mountify has two ways to do that, and they are not the same: one is fast and careful, the other is complete and permissive. This article walks both of them, field by field, and says when to use which.
Read this first: a manual booking sends the client NO email. Ever. No confirmation, no reminder, no review request. Every client-facing email is sent only for bookings made through your public page. Neither manual booking form even has an email field — and even if the client’s record holds an email, they will receive nothing. If you want to write to them, that’s a separate, deliberate action: Invite by email from the clients list.
1. Which one to use
| Quick book | The schedule form | |
|---|---|---|
| Opened from | New booking in the left rail, or ⌘/Ctrl + B | New booking in the schedule, or clicking an empty slot |
| Shows free times | Yes — real availability, computed the way a customer sees it | No — you type the time yourself |
| Allows double-booking | No. It refuses and explains | Yes. It only warns |
| Handles classes and rentals | No | Yes |
| Asks for a phone | Yes | Yes, only for a new client |
| Best for | A client on the phone: “when do you have a slot?” | Squeezing into a break, back-dating, a class, a rental |
In short: Quick book is for the normal case, the schedule form is for the exceptions.
2. Quick book — step by step
- Press New booking in the left rail (or
⌘/Ctrl+Bfrom any page). A New booking drawer opens on the right with the board name under the title. - The client is the first step. Type into Name or phone… — search starts after a few letters and lists matching clients with their last visit. If you have no clients yet, the panel says so: “No clients yet — create the first one right below.”
- Click a match to continue with them.
- Or press New client and fill Name… and +359 … (optional).
- Here’s the detail that matters. Under the fields the panel tells you what each choice does: with a phone — “Will be saved as a client — searchable later, with their history kept.”; name only — “Name-only still books, but the client won’t be saved for later. A phone number saves them.” A badge next to the field reads will be saved or this booking only.
- Service. A Pick a service… dropdown with each duration next to the name. If the board has classes, group services or rentals, a line under the list says: “Classes, group services and rentals are booked through the schedule.” — they’re deliberately absent here.
- Specialist. Pills: Anyone (the default — searches across everyone eligible) or a specific name. If the client has been with someone before, a star sits next to that pill and a usual ✓ badge next to the service: that’s an automatic guess from their history, and you can override it freely.
- Location — only if the board has more than one branch offering the service. Until you pick, it says “Pick a location to see free times.”
- Free times. A day strip sits on top: ⚡ soonest (the default), today, tomorrow, the next few days, and another date (opens a calendar).
- In soonest mode you get a list of the nearest free times over the next 14 days, each with the day, the time and the specialist’s name.
- With a specific day picked, you get a grid of times for that day only.
- Click a time — it highlights.
- Press Book. The drawer closes and a toast reads Booked: <name> with the day and time, plus an Open the booking button.
What can stop you in Quick book
| Message | What it means | Way out |
|---|---|---|
| That time was just taken. Here are the next free ones — nothing was booked. | Someone took the slot while you were choosing. Nothing was double-booked | Pick another time from the refreshed list |
| This client is banned in the workspace. + a Book anyway button | The client is banned | Either back out, or press the button (needs the right permission) |
| You can’t override the ban — only a manager can. | You tried to override without the permission | A manager has to lift the ban |
| No free times in the next 14 days + Check 30 days | There genuinely aren’t any | Extend the horizon, or open the schedule |
| This service can’t be booked — “It requires a ‘<kind>’, and the team has none. Online clients see ‘no free times’ too.” | The service needs a resource kind that doesn’t exist | Add one — an Add <kind> button sits right in the panel |
| <date> is a day off — the venue is closed. | Closed | Another day, or open working hours |
| <date> is fully booked — no free times. | A full day | See the next day |
| Couldn’t load the times. | Network trouble | Try again |
3. The schedule form — step by step
This is the complete form. It doesn’t check availability — it takes whatever you type and merely warns.
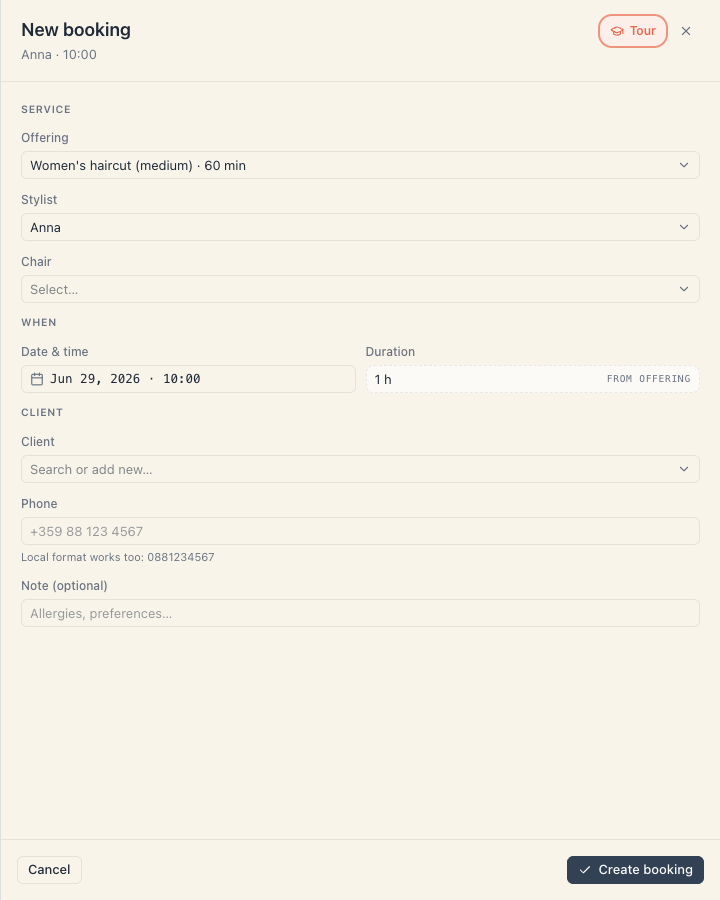
- Open Schedule and either press New booking top-right, or click the empty space at the column and time you want. Clicking is faster — it prefills the resource and the time.
- A New booking panel opens on the right. Its header shows the chosen resource (or Pick a resource) and the time.
The amber warning at the top
If the spot you picked is problematic, an amber strip appears at the very top of the panel. It never blocks the booking — it only informs:
| Text | When |
|---|---|
| This date is in the past — the booking will be saved retroactively. | You picked a past day |
| This time has already passed today — the booking will be saved retroactively. | Today, but the hour has gone |
| This day is marked closed. The booking will still be created. | A day outside the venue’s hours |
| <name> isn’t available then (day off, break or outside working hours). The booking will still be created. | The resource doesn’t work then |
Back-dating is a normal daily operation — it’s exactly how you record a visit that happened but nobody had time to enter.
The Service section
- Offering — a dropdown with every service on the board. The duration sits next to the name, and for group services the capacity too (
×N). Leave it empty and saving raises Pick an offering before saving. - One row per required resource kind — e.g. Stylist, Chair. Each row is a dropdown of that kind’s resources. If the kind has a capacity above 1, a N/M free counter for the chosen time lights up on the right of the row.
- If the kind allows a quantity (say, “how many pairs of skates”), a Quantity row with a stepper appears below. Exceeding it shows Exceeds free stock at this time.
- If the chosen resource is already busy in that window, a red line appears under the dropdown: Busy <from>–<to> · <who>. You can still book — it’s a warning, not a block.
- A missing required resource raises Pick all required resources.
The When section
- Date & time — one control with a calendar and a time picker. You can change the day from here without going back to the grid. An invalid time raises Use HH:mm for the start time.
- Duration — a grey read-only field hinted from offering. It isn’t editable here: the duration comes from the service. If you need a different one, make a service with a different duration.
The Client section (for a one-to-one service)
- Client — a search field labelled Search or add new…. Type a name or phone; the list shows existing clients. With no match it offers Add new client “<name>” and Book “<name>” as a walk-in.
- Pick an existing client and their phone appears under the field read-only — you’re not asked twice.
- An empty field raises Add the client’s name.
- Phone — shown only when you have not picked an existing client. Format
+359 88 123 4567, with the hint “Local format works too: 0881234567”. Once you’ve typed a name, the hint changes to “We’ll save this phone to the new client”. - Note (optional) — placeholder Preferences, notes…
The Participants section (for a group service)
If the service has a capacity above 1, the single-client fields are replaced by a Participants list with an N/capacity counter. You add people one at a time (existing or new). An empty list raises Add at least one participant.
Saving
Press Create booking. The button disables itself while the request is in flight, so a double click can’t mint two identical bookings. If something goes wrong you get Couldn’t create booking.
4. What this does to the client card — read carefully
There are three different outcomes here, and the difference between them surprises people:
| What you did | What happens to the card |
|---|---|
| Picked an existing client from search | The booking is tied to their card. History, visits and money land there. The Note field is NOT saved anywhere — see below |
| Typed a new name + phone | A client is created (or an existing one with the same phone is found). The note goes into the Notes field of their card — but only if that field was empty |
| Typed only a name, no phone | No client is created. The name and the note live on the booking alone. You won’t find that person under Clients and they’ll have no history |
A known behaviour worth knowing: when you pick an existing client from search, whatever you write in Note is dropped on save. If the note matters, put it on the client’s card instead — Clients → the client → Notes. See Notes & preferences.
5. The status a manual booking is born in
A manual booking is created as Confirmed. It doesn’t pass through a pending / confirm-by-email step — that mechanism exists only for public bookings. So:
- The booking holds the slot immediately.
- There is no confirmation deadline and no auto-cancel for not confirming.
- If the service carries a deposit, a manual booking does not ask for prepayment — the deposit belongs to the public checkout.
The only statuses a brand-new booking may be born in are Confirmed, Pending and Walk-in. Everything else (completed, cancelled, no-show) is reached by changing the status later. See Booking statuses.
6. A banned client
If the client is banned in the workspace, the booking is refused with a ban code. In Quick book that surfaces as an amber box with a Book anyway button — the override is available only to someone with the right permission. A ban covers the whole workspace, not one board. See Ban & archive clients.
7. Rentals and classes
- A rental — bookable only through the schedule form. Rentals are deliberately hidden from Quick book.
- A group class — also only through the schedule (or the Class schedule panel). For a class the form asks for participants, not a single client.
- A full class — new participants land on the waitlist and are promoted manually. See Capacity & waitlist.
8. Troubleshooting
| Problem | Cause | Fix |
|---|---|---|
| New booking errors with “Add a resource before creating a booking.” | The board has no resources at all | Catalog → Team & resources → add one |
| I can’t find the service in Quick book | It’s a class, a group service or a rental | Use the schedule form |
| The client doesn’t appear under Clients after the booking | You entered a name only, no phone | Add them by hand: Clients → Add client |
| The booking landed on the wrong branch | The branch is derived from where the chosen resource works on that date | Pick a resource that works at the right branch |
| The client is waiting for a confirmation email | Manual bookings send nothing | Phone them, or use Invite by email from the clients list |
| My selection in the drawer vanished | Changing the service, specialist, location or day clears the chosen time | Pick a time again |
What’s next
- The calendar (Schedule) — the screen the booking lives on.
- Booking statuses — what happens after you create it.
- Your booking clients — the list new clients land in.
- Confirmations & reminders — which email goes when, and why none goes for a manual booking.