Add a resource
Add a staff member, chair, room or equipment, and set whether clients see it.
Adding a resource isn’t cosmetic — it’s the moment a service becomes bookable. The form is long, but most fields are optional: a working resource needs exactly a type and a name. Everything else makes the resource easier to recognise in the schedule and more convincing on the public page.
This article walks the editor section by section, in the order you see it on screen.
1. Before you start: you need a kind
A resource always lives inside a kind (a group). If the board has no kinds yet, the form says “Create a resource kind first.”
Creating a kind is a separate short task: Catalog → Resource kinds → Add kind. See Creating and managing resource kinds.
2. Open the form
Two routes lead there:
From the kind’s page (the shortest):
- Catalog → <kind name> (e.g. Catalog → Stylists).
- Top right, click Add <kind>.
- The form opens with the correct type already selected.
Right after you create a kind: a message appears — “The ‘<name>’ kind is ready — add the first one.” with an Add <name> button, which also lands here with the type pre-selected.
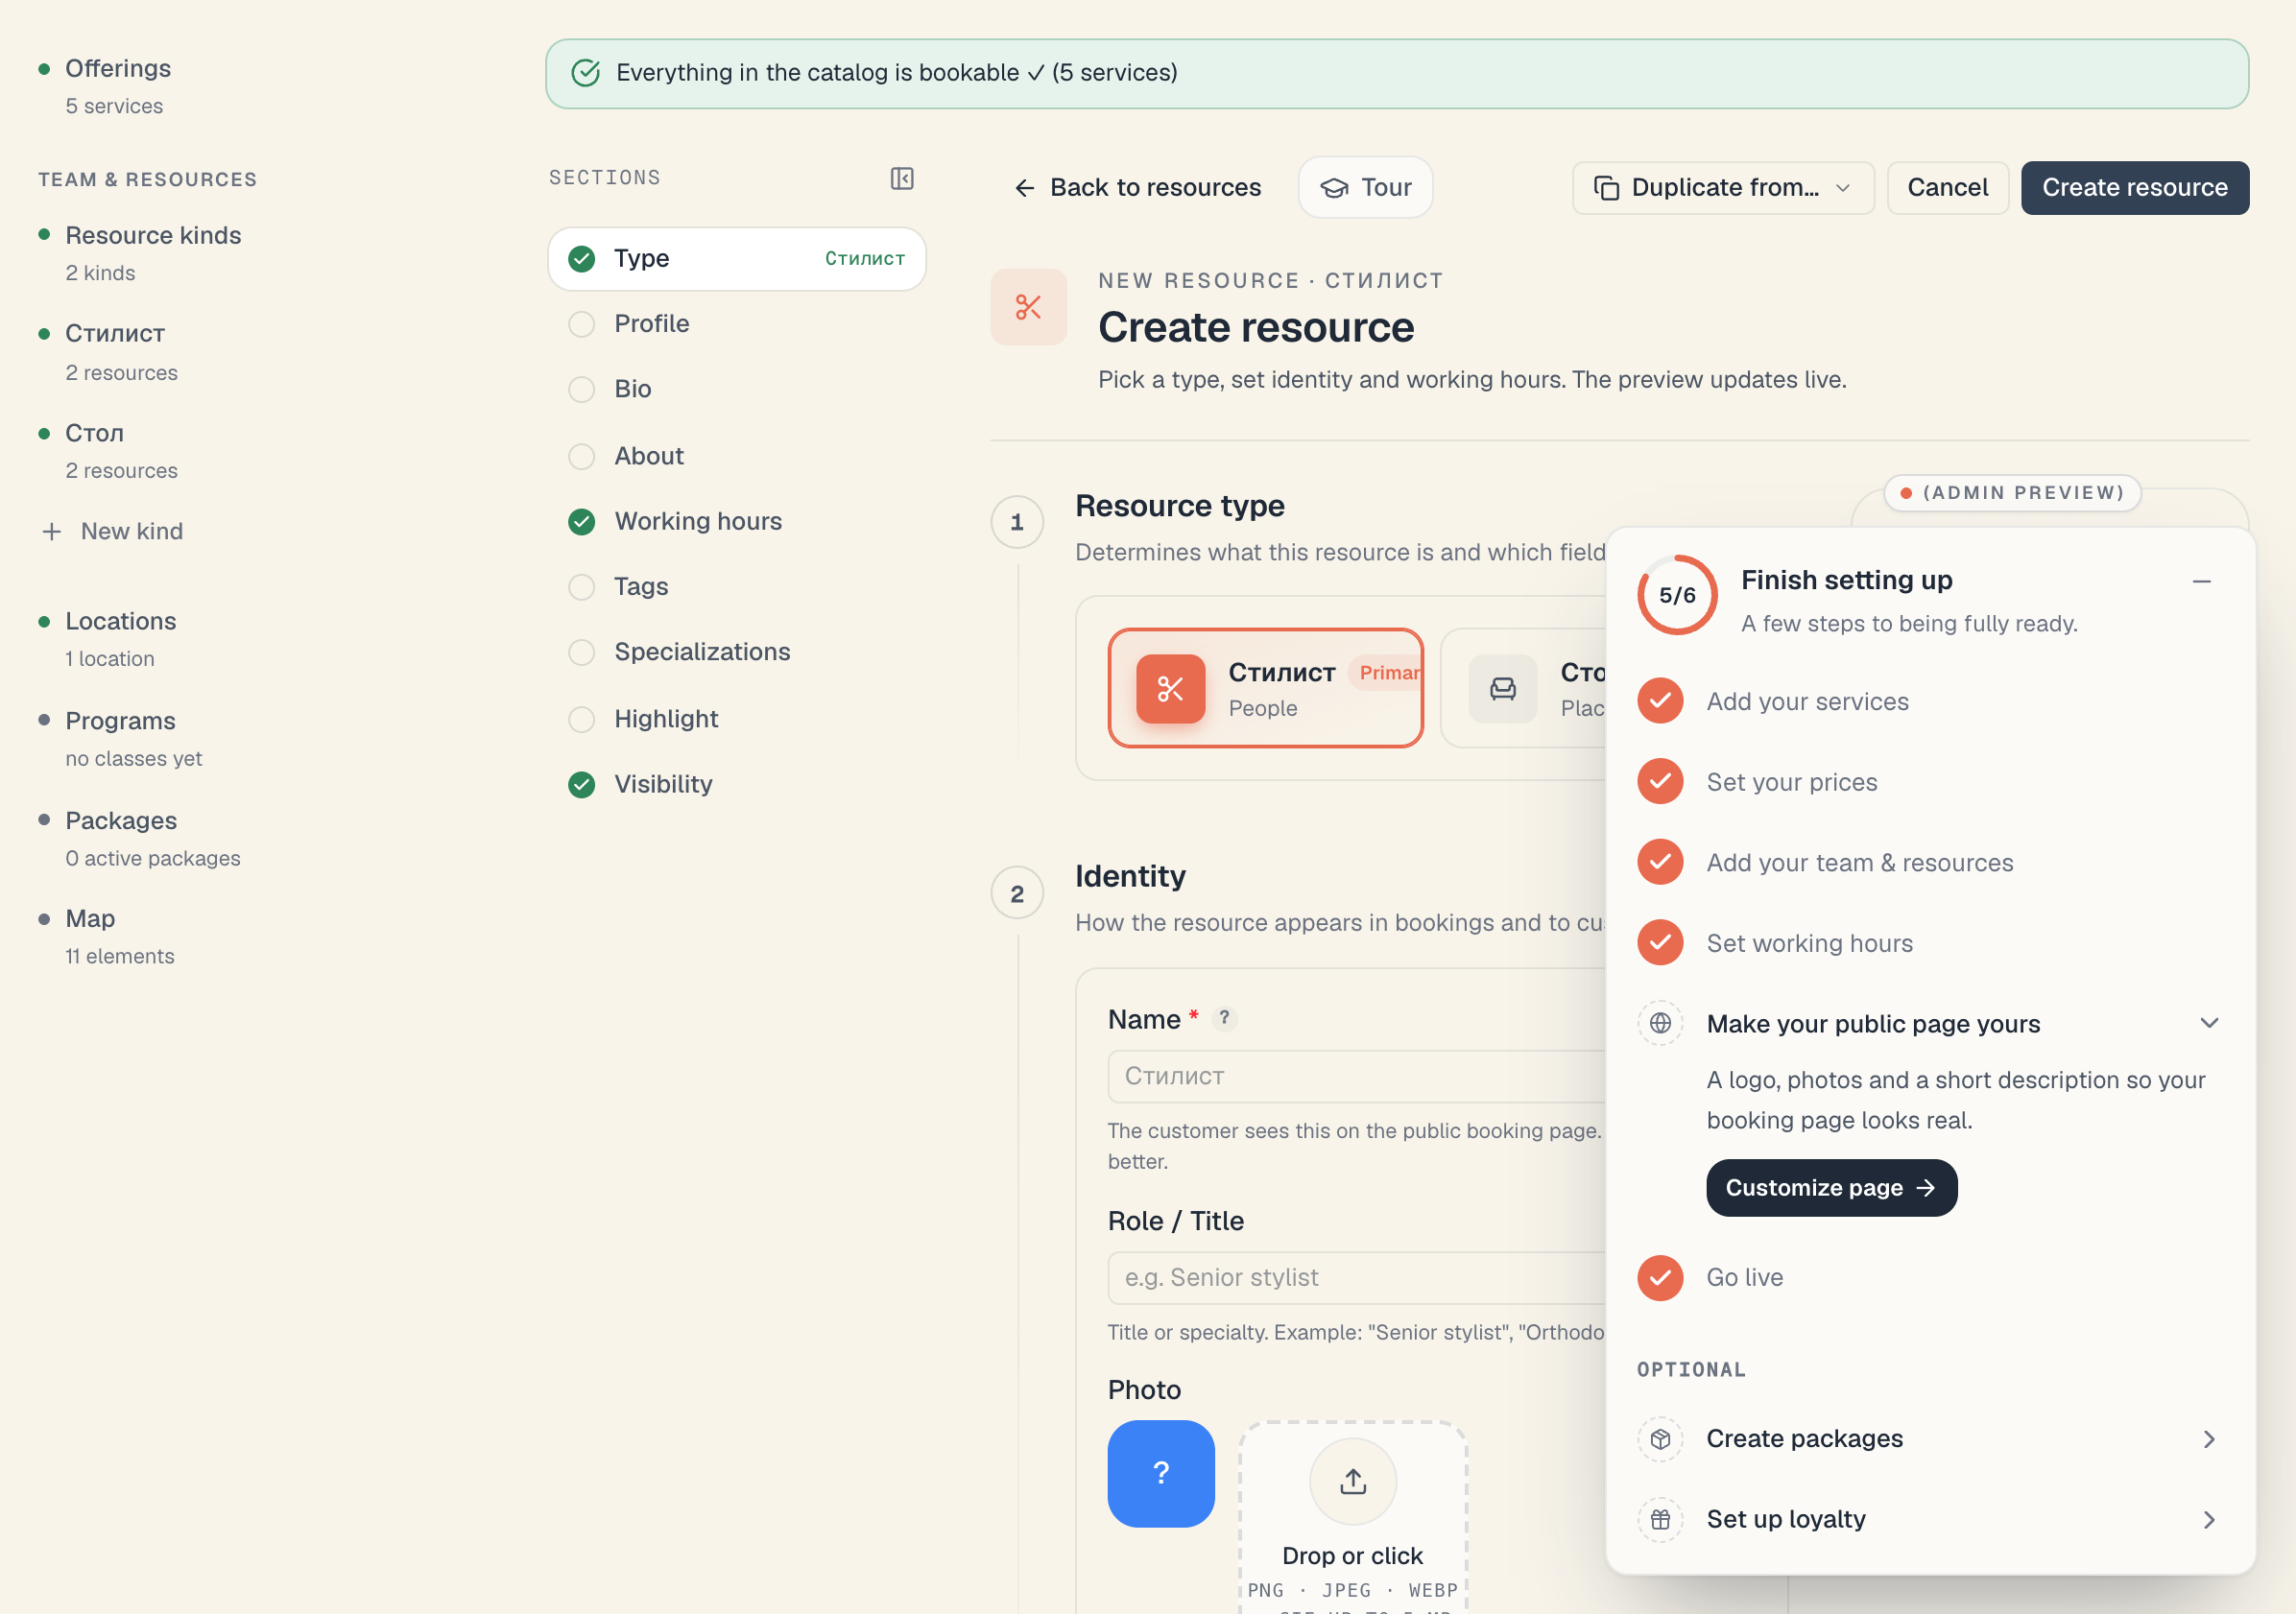
How the page is laid out:
- left — a Sections rail listing every section with a dot next to each (green = filled in). Clicking flies to the section; the rail folds away with Collapse;
- middle — the numbered sections themselves;
- right — a live preview with three tabs: Card, Week and Feasibility, captioned “Updates live as you type.”;
- top right — Duplicate from… (create mode only), Cancel and Create resource.
Which sections you see depends on the selected kind’s category. A person has Short bio, About and Working hours; equipment has Stock count; Home location appears only on boards with 2+ locations. So the section numbers on your screen may differ from the ones below.
3. The «Resource type» section
The first section. It shows a card per kind on the board — icon, name, a Primary badge (if it is), and the category underneath (People, Places, Equipment or Things). Click a card to pick it.
The description in create mode reads “Determines what this resource is and which fields are shown.”
Important and irreversible: when editing an existing resource this section is locked — “Type cannot be changed after creation.” plus the hint “Type is locked — delete and recreate to change.” If you’ve picked the wrong kind, stop here and switch before you press Create resource. Otherwise the only way out is a new resource plus archiving the wrong one.
4. The «Identity» section
Description: “How the resource appears in bookings and to customers.”
Name (required)
The only field with an asterisk. The hint underneath: “The customer sees this on the public booking page. Shorter is better.” The ”?” icon next to the label adds that the name also appears in confirmation emails.
The placeholder changes with the category:
| Category | Placeholder |
|---|---|
| People | ”e.g. Anna Petrova” |
| Places | ”e.g. Room #2, Studio «Loft»“ |
| Things | ”e.g. Chair #1, Table 3” |
| Equipment | ”e.g. Wahl Magic Clip clipper” |
There’s a nicety too: if the kind already holds “Court 1”, “Court 2” and “Court 3”, the placeholder becomes “Court 4” — the form spots the numbering and offers the next one.
Leave the name empty and saving refuses with “Give it a name (up to 120 characters) — it can’t be empty.”
Role / Title (people only, optional)
Hint: “Title or specialty. Example: ‘Senior stylist’, ‘Orthodontist’.” Placeholder: “e.g. Senior stylist”.
The role shows under the name in the list, in the schedule and on the public profile. An empty role simply isn’t rendered — nothing breaks.
Photo / Primary photo
The label is Photo for people and Primary photo for everything else. Hint: “PNG / JPEG / WEBP, up to 5 MB. Square works best.”
With no photo, initials over the resource colour are used — that’s perfectly fine, not an error state.
Color
A 12-colour palette. Hint: “Shown in the schedule grid.” Next to the palette is a mini-preview of the initials on the chosen colour, captioned “preview”.
The practical advice: give every person a distinguishable colour. The whole schedule is read by colour, and two near-identical blues create confusion daily.
5. The «Short bio» section (people only)
Description: “Shown on the specialist’s public profile page.”
One Bio field with the hint “Short intro on the public profile. Customers read it when picking a stylist.”, the placeholder “Share something about experience and working style…” and a counter “N characters left”. The cap is 500 characters, and under 50 remaining the counter turns amber.
Left empty, the public profile simply has no such paragraph.
6. The «About» section (people only)
Description: “Details customers ask about: experience, languages, certifications, social profiles.”
| Field | What to enter | Where it shows |
|---|---|---|
| Years of experience | a whole number (0–80) | the public profile, experience row |
| Languages | chips, “en, bg, ru…“ | the public profile |
| Specialties | chips, “Type and press Enter” | the public profile, specialties row |
| Certifications & training | rows of Title, Issuer, Year | the public profile, its own block |
| Social profiles | Instagram, TikTok, Telegram, Facebook, Website | icon links on the profile |
Social fields accept both @handle and a full address — Mountify turns either into a working link.
For some business types extra industry-specific fields appear here as well.
Everything here is optional. Empty fields don’t leave orphan labels on the public profile — they disappear. Details: A specialist’s public profile.
7. The «Working hours» section (people only)
Description: “Base weekly schedule. Overrides, time-off and per-day locations live in Schedule & Leave.”
Two helpers sit above the grid:
- Apply Mon to all — copies Monday onto the other six days;
- Copy from… — a dropdown of the board’s other people; takes their whole weekly schedule.
The grid is per day. Breaks are carved with the mouse on a day’s strip — the hint says: “Tap a day strip to add a break — drag edges to resize, center to move.”
When editing an existing person, a Schedule & Leave link appears below with “Per-day locations, overrides and time-off for this person.” That’s where time off, special days and branch rotation live — see A staff member’s schedule.
Non-person resources don’t have this section. They follow the board/location schedule; the preview on the right says “Schedule inherited from location / board.”
8. The «Home location» section (non-people, 2+ locations only)
Description: “Where this resource physically lives.” — for equipment: “The location where this equipment is stored.”
A single dropdown of the board’s locations, placeholder “Select a location”.
- Choosing is effectively required. There is no “anywhere” option: a room or a machine sits at one branch.
- Pick nothing and the resource is attached to the board’s primary location.
- For a person the field isn’t shown at all — they rotate by day. Trying to set a location on a person returns “A person doesn’t have a home location — that’s only for rooms and equipment. Clear it.”
9. The «Tags» section
Description: “Free-form labels used for filters in public booking (e.g. Hard, Clay, Indoor for a tennis court).”
Type a word and press + (or Enter). Tags already used on the board are offered as autocomplete. Hint: “Free-form keywords. Help filter in the admin panel and the public search.”
Practical use: in hourly rentals the tags become filter chips in the customer’s resource picker (e.g. “Indoor”, “Hard”, “Clay”). For people they’re mostly internal labelling.
Don’t confuse Tags with Specialties. Specialties are publicly visible keywords on a stylist’s profile; tags are filter labels. See the table in A specialist’s public profile.
10. The «Specializations» section
Description: “Which offerings this resource can perform.”
This section appears only when the kind is required by two or more services. With a single service there’s nothing to choose and the section is absent — that’s not a bug.
The state line sits on top: Available for all offerings or Available for N of M offerings, with an All button on the right. Below are service chips; ticked ones carry a ✓.
This is a silent filter with real consequences. Narrow the list and services outside it stop showing free times for that person — with no warning. Read Which services a resource can perform before touching it.
11. The «Stock count» section (equipment only)
Description: “How many interchangeable units are in stock.”
A stepper, minimum 1. Below it the system spells out the result: “4 units — can serve up to 4 parallel bookings”, and adds “How many units of this equipment you have. Customers will book one from the available pool.”
The count is charged in full against your plan’s bookable-spots limit: one resource with a stock of 4 uses 4 spots. See Equipment stock and parallel capacity.
12. The «Highlight» section
Description: “Badge chip + accent outline on the resource’s public card — e.g. ‘HIT’, ‘Top master’, ‘New’.”
| Field | What it does |
|---|---|
| Label | the chip’s text; “Leave empty for outline-only” |
| Icon | an optional glyph next to the label; No icon available |
| Accent color | ”Tints the chip and the card outline”; Clear / No accent |
If all three are empty, there’s no highlight. Use it sparingly — when every stylist is a “HIT”, the highlight means nothing.
13. The «Visibility» section
Description: “Control resource availability without deleting it.” Three toggles:
| Toggle | On means | Hint in the UI |
|---|---|---|
| Active · available for booking | normal operation | ”Inactive resources are created but not selectable in public booking and don’t count toward your plan’s bookable-spots limit.” |
| Hidden from customers | works in admin, invisible to customers | ”Customers won’t see this resource in public booking, but admins and the schedule still use it.” |
| Archive | out of service, history preserved | ”Archived resources can’t receive new bookings, but historical bookings and reports still see them.” |
On create, leave Active on and the other two off — that’s the ordinary working resource.
Archive asks for confirmation: “Archive this resource?” / “It will stop accepting new bookings and disappear from public booking. History and reports are kept. You can restore it anytime.” / Archive.
Which lever, when: Hiding & archiving resources.
14. Save
Press Create resource (when editing — Save changes). The button reads “Saving…” while it works.
What can happen:
- Success. A “Resource created” message and a return to the kind’s page.
- Success, but inactive. If the plan is at the cap, the resource is created inactive and you see “Bookable-spots limit reached” with “The resource was created inactive because your plan is at its bookable-spots limit. Upgrade your plan to activate it.” and an Upgrade plan action. Creation never fails because of the cap — only activation does.
- Form errors. A panel appears at the top: Let’s fix a few things before saving, with a count (“N things need a quick change.”) and a Go to it button per issue. The panel shows all problems at once.
- A post-save check (when editing). Mountify probes the availability of services that depend on this resource. If one has become unbookable you stay on the page and see an amber “N services will show clients ‘no available times’” with the reason and a Fix button. If all is well — “Bookable — next free slot: <date and time>”.
Bonus: «Duplicate from…»
Create mode only, top right. It lists every existing resource grouped by kind with a colour swatch. Pick one and the form fills with all of its fields (working hours, specializations, tags, highlight), with (copy) appended to the name.
It’s the fastest way to add a second person on the same schedule, or a fifth identical court. Don’t forget to change the name.
The fields at a glance
| Section | Required | Shown for | If left empty |
|---|---|---|---|
| Resource type | yes | all | can’t save |
| Name | yes | all | can’t save |
| Role / Title | no | people | not rendered |
| Photo | no | all | initials on the colour |
| Color | pre-picked | all | — |
| Bio | no | people | no paragraph on the profile |
| About | no | people | rows disappear |
| Working hours | pre-filled | people | 9–18, Sunday closed |
| Home location | effectively yes | non-people, 2+ locations | the board’s primary location |
| Tags | no | all | no filters |
| Specializations | no | when 2+ services need the kind | all services |
| Stock count | no (defaults to 1) | equipment | 1 |
| Highlight | no | all | no chip |
| Visibility | pre-set | all | active and visible |
Errors you may see
| Message | What it means | What to do |
|---|---|---|
| ”Give it a name (up to 120 characters) — it can’t be empty.” | empty or over-long name | use a shorter name |
| ”Keep the role title under 120 characters.” | role too long | shorten it |
| ”Pick a colour with the colour picker — it’s used on the calendar.” | the colour got lost | pick from the palette |
| ”The photo needs to be a valid image link. Try uploading it again.” | the upload failed | re-upload the image |
| ”The working hours don’t make sense — the end of the day (or a break) must come after its start.” | inverted hours | fix that day in the grid |
| ”A person doesn’t have a home location — that’s only for rooms and equipment. Clear it.” | a location on a person | clear the field |
| ”A person is a single resource, so it can’t have a quantity above 1. Remove it.” | a stock count on a person | set it back to 1 |
| ”How many identical units there are — between 1 and 100.” | stock out of range | enter 1–100 |
| ”One of the selected specializations doesn’t belong to this board (or is the wrong type). Re-pick them.” | an incompatible service | press All and re-select |
| ”This resource type doesn’t belong to this board.” | a kind from another board | pick a kind from this board |
| ”Plan limit reached” | the spots cap is full | deactivate another resource or upgrade |
What this form does NOT do
- It doesn’t change the type after creation.
- It doesn’t upload a gallery. One image (the avatar) only.
- It doesn’t set a price on the resource. Prices live on services.
- It doesn’t set time off or special days. Those live in Schedule & Leave.
- It doesn’t email anyone. Adding a stylist sends no messages to customers.
- It doesn’t grant system access. A resource is a “bookable unit”, not a user. To let the person log in to Mountify you need a separate invitation — see Staff vs. resource.
Troubleshooting
The «Add» button is greyed out. The board has no kinds. The message is “Create a resource kind first.”
I saved, but the new person isn’t in the schedule. Columns come from the primary kind. If the person sits in another kind, switch kinds in the schedule.
I saved, but the customer can’t see them. Check the Visibility section for Hidden from customers, and check Specializations — the service may be outside their list.
It asks me to save when I try to leave. That’s the unsaved-changes guard: leaving with pending edits asks whether to discard them. Expected behaviour.
I want to add 20 resources at once. There is no file import. Use Duplicate from… — build the first one carefully, the rest are three clicks each.
What’s next
- A specialist’s public profile — which of these fields the customer sees.
- Which services a resource can perform — the silent filter.
- Hiding & archiving resources — the four levers.
- A staff member’s schedule — time off and special days.