Embed on your own site
Put the booking form on your own site — inline, a button or floating — with one short snippet.
If you already have a website, there is no need to send clients somewhere else. Embedding puts the booking form inside your own site with two lines of code you copy ready-made. The client books an appointment without ever leaving your page.
This article walks the whole process: where the embed studio lives, what every setting does, what the code actually looks like, exactly where to paste it, and what embedding does not do.
No website? Then you don’t need this. Just share the link to your booking page — see Share on social media. The app says the same thing: “No website? You don’t need this — just share your booking page link instead.”
1. Where the embed studio is
- In the left icon rail open the boards product and pick your board.
- In the board column click the Setup hub.
- In the Storefront group choose the Public site row.
- Under the heading there are two pills: Site settings and Embed. Click Embed.
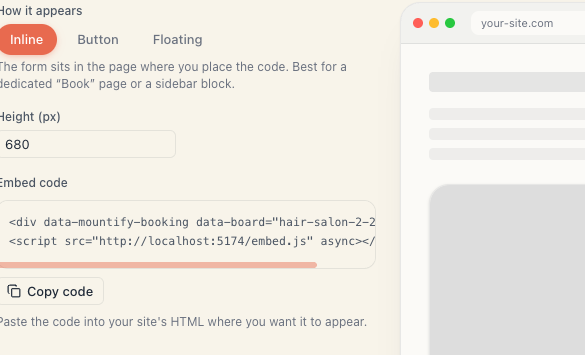
The screen is split in two. On the left are the settings and the code; on the right a mock browser with the address “your-site.com”, showing exactly how the widget will look. That preview is the real widget, not a picture — you can click through it.
Above the settings is an explanatory box: Have your own website? “Embedding adds the booking form to your own site (WordPress, Wix, a custom site, and more). Copy the code below and paste it where you want it to appear.”
2. The settings, one by one
”How it appears” — the three modes
| Mode | What it does |
|---|---|
| Inline | The form sits directly in the page, where the code is |
| Button | A button that opens booking in a popup |
| Floating | A permanent tab in the bottom-right corner of every page |
A detailed comparison with advice on when to pick which is in Embed display modes.
The fields that appear per mode
| Mode | Visible fields |
|---|---|
| Inline | Height (px) |
| Button and Floating | Button text, Colour, How it opens |
- Height (px) — from 360 to 1200, in steps of 20. Default 680.
- Button text — defaults to “Book now”. Leave it empty and only the calendar icon shows.
- Colour — the button’s colour. Default is a near-black navy (
#111827). - How it opens — Popup (centred overlay) or Side sheet (slides in from the right). On a phone both go full-screen.
3. The code
Below the settings is an Embed code block with the ready snippet and a Copy code button. The code updates live as you change the settings.
The simplest version (mode Inline, everything default) looks like this:
<div data-mountify-booking data-board="my-salon"></div>
<script src="https://book.mountify.eu/embed.js" async></script>
If you changed the height:
<div data-mountify-booking data-board="my-salon" data-height="900"></div>
<script src="https://book.mountify.eu/embed.js" async></script>
Button mode with a label and a colour:
<div data-mountify-booking data-board="my-salon" data-mode="popup" data-label="Book now" data-color="#c2410c"></div>
<script src="https://book.mountify.eu/embed.js" async></script>
Floating mode opening as a side sheet:
<div data-mountify-booking data-board="my-salon" data-mode="bubble" data-panel="sidesheet" data-label="Book now"></div>
<script src="https://book.mountify.eu/embed.js" async></script>
What each part is
| Part | Role |
|---|---|
<div data-mountify-booking …> | The spot where the widget will appear |
data-board="…" | Your page address — the last part of your booking link |
<script src="…/embed.js" async> | The script that turns the <div> into the widget |
data-board comes from the Address (the last part of the link) field on the Site settings tab. It accepts lowercase Latin letters, digits and hyphens only. If you change the address, the old code stops working and you must copy the new one.
The script goes in once per page, even if you have several buttons. A second
<script>tag simply does nothing.
4. Where to paste the code
The general rule: into the page’s HTML, exactly where you want it to appear.
| Mode | Where |
|---|---|
| Inline | In the block of the page where the form should be — e.g. a “Book” page |
| Button | Wherever the button belongs — the hero section, next to prices, at the end of the page |
| Floating | Anywhere — the tab positions itself in the corner. Easiest is a shared template so it’s on every page |
Step-by-step for the most common platforms:
If someone else looks after your site, just send them the copied code and tell them which page it goes on. The app phrases it the same way: “Paste the code into your site’s HTML where you want it to appear — or send it to whoever manages your website.”
5. Conditions for the embed to work
The embed shows the same booking flow as your public page. So the same conditions apply:
| Condition | Where to check |
|---|---|
| The Online booking switch must be on | Setup → Public site, at the very top |
| There must be at least one bookable service | Catalog → Offerings |
| There must be working hours | Setup → Working hours |
| The subscription must be active | Workspace settings → Subscription |
If any of these is missing, the embedded booking won’t load. Diagnosis in Troubleshoot the embed.
6. Extra options (for someone comfortable with code)
These aren’t in the interface, but the script supports them. Add them to the <div> by hand:
| Attribute | What it does |
|---|---|
data-service="<offering id>" | Opens booking with a service preselected |
data-lang="bg" or data-lang="en" | Forces the widget’s language |
data-radius="16px" | Corner rounding in Inline mode |
data-position="left" | Puts the floating tab in the left corner instead of the right |
You can also turn your own button into a launcher:
<button data-mountify-trigger="my-salon">Book now</button>
<script src="https://book.mountify.eu/embed.js" async></script>
And open booking from your own JavaScript:
window.mountifyBooking.open("my-salon");
window.mountifyBooking.close();
7. What embedding does NOT do
- It doesn’t inherit your site’s styling. The widget renders inside an isolated frame (an iframe) — your fonts and colours don’t get in, and its styles don’t leak out. Its look is controlled from the booking-page editor.
- It doesn’t auto-resize its height. In Inline mode the height is the one you set. If the form is taller, it gets its own scrollbar inside. That’s why 680 px is a sensible starting value.
- It isn’t a separate page. Changes in the editor apply to the public page and the embed at the same time — they are not configured separately.
- It doesn’t run on a custom domain. Booking lives at
book.mountify.eu/<your-address>; there are no custom domains. - It needs no maintenance. Once the code is in, new services and changed hours appear automatically.
What’s next
- Embed display modes — which mode when, and how it looks to the client.
- Add to WordPress — step by step.
- Add to Wix or Squarespace — using a code block.
- Troubleshoot the embed — quick checks.