Give staff a login
Invite a team member to sign in to the admin — step by step, by email.
A “login” means the colleague signs in to the Mountify admin with their own email and their own password. You don’t set their password and you never see it — they go through registration themselves. This article follows the whole path from your side and from theirs, including the screens where people usually get stuck.
A login is free. What you pay for is bookable spots (the active resources a customer can book), not users. If the person also needs to be bookable by customers, that’s a second, separate job — see Staff vs. resource.
1. Decide what they can do before you invite them
Permissions are set inside the invitation itself. So think first:
| If the person is… | Give them… |
|---|---|
| A manager who decides everything | Admin — but know that Admin can do everything, including the subscription |
| Front-desk reception | A custom role: Bookings (View · Add · Edit · Delete, because cancelling an appointment is a Delete) + View and Edit booking clients |
| A stylist who runs their own calendar | A custom role: Bookings (View · Add · Edit) + Booking boards on View only |
| An accountant | Viewer |
The ready Member role is broader than it sounds (it can change services, prices and working hours, but cannot see the clients). Read What each role can do before you pick it.
2. Send the invitation
- Click the business monogram tile at the top of the narrow rail on the left and choose Members. (Or: Workspace settings → Users & Permissions.)
- Click Invite people at the top right.
- Step 1 “People” — in the Who should we invite? field enter the email. One per line if there are several.
- Continue.
- Step 2 “Permissions” — open the selector at the top left and apply a role, or tick the boxes by hand. At the bottom set Invitation expires in — 1, 3, 7, 14 or 30 days (7 by default).
- Continue.
- Step 3 “Review” — check Recipients, Based on, Permissions and Expires.
- Click Send 1 invitation.
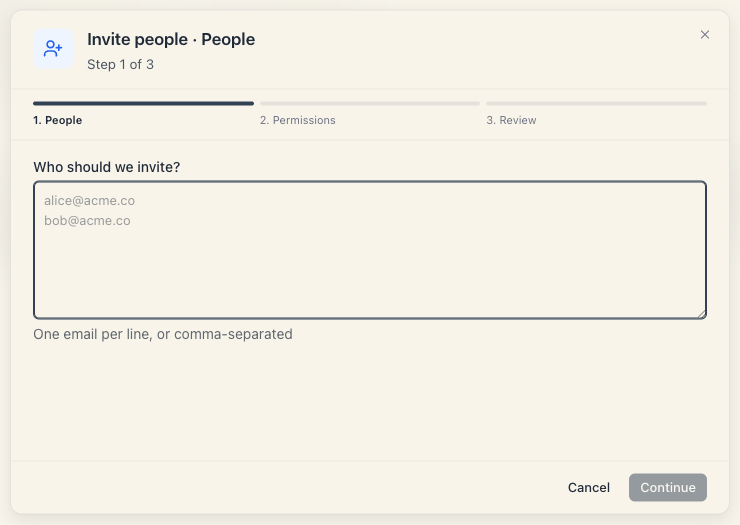
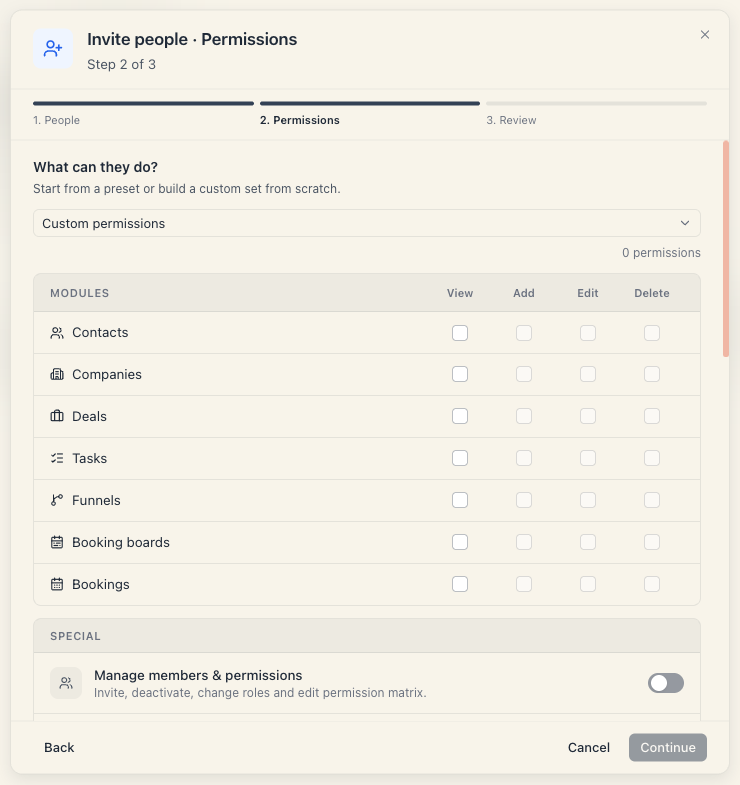
Use the exact email the person will sign in with. The invitation can be accepted only by an account with that address. If they register with a different email they’ll hit the “This invitation is for a different account” screen and have to sign out and start again.
3. Where the invitation waits
Open the Invitations tab. There’s the new row with status Sent, the date under Sent, and the remaining time in Expires / Action by (“48h left”, “6d left”).
This person is not in the Members tab yet. There is no “invited” status in the members list — they appear there only once they accept.
4. What the colleague does — screen by screen
The sign-in and registration screens are in English in the Bulgarian version too, because they’re part of the sign-in system.
- They open the email and click the link.
- They see “You’ve been invited to «Business name»” with the line “Sign in or create an account for … to accept this invitation.” They click Sign in / Sign up.
- Account creation, screen 1 — “Create account”. They enter their email and click Continue.
- Screen 2 — “Check your email”. A six-digit code arrives. They type it into the Verification code field and click Verify. If the code hasn’t arrived there’s a Resend code link after a short wait.
- Screen 3 — “Set password”. They set a password — at least 8 characters — confirm it and click Create account.
- They return to the “Join «Business name»” screen.
- If their profile has no name yet, a Tell us your name block appears with First name (required) and Last name. The Accept button stays disabled while First name is empty.
- They click Accept and land in the business a second or two later.
If the colleague already has a Mountify account (from another business, say), they click Already have an account? on the registration screen and simply sign in. The invitation is accepted with that same account, as long as the email matches.
5. Check that it worked
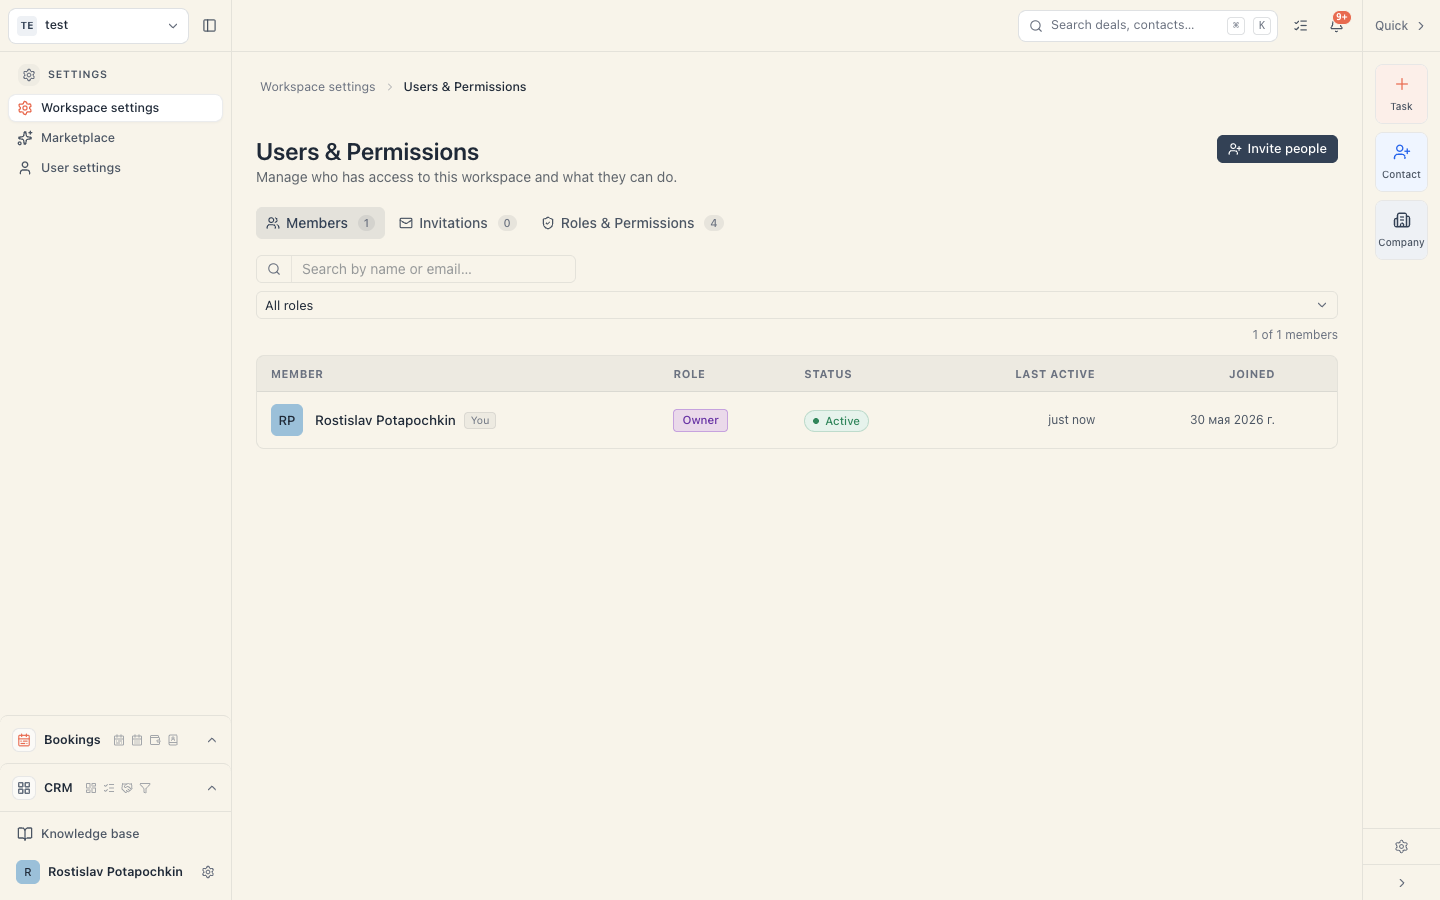
- Open Users & Permissions → the Members tab.
- The new person is there with status Active (green dot).
- The Role column shows either the role’s name or Custom — the latter just means “a hand-picked set”.
- The Joined column shows today’s date.
In parallel, in the Invitations tab the invitation’s status becomes Accepted.
6. Tell them what comes next
A few things that save questions on day one:
- Language is personal. Each person picks Bulgarian or English in User settings → Language.
- Theme and text size are personal. User settings → Appearance.
- Two-factor authentication is switched on by the person themselves — you can’t enable it for them.
- They will see every board in the business. Access to just one board doesn’t exist — see Can I limit someone to one salon?.
Common questions
Can I set their password? No. The password is set by them and you never see it. If they forget it, they use “Forgot password?” on the sign-in screen.
Do I have to pay for one more person? No. See Does adding a teammate cost extra?.
If the person is also a stylist on the schedule, do I have to do two things? Yes — an invitation for the login, and separately a resource under Catalog → Team & resources. The two are not linked automatically. See Staff vs. resource.
Can I invite someone on a shared mailbox (like salon@…)?
Technically yes, but it’s a bad idea: the password becomes shared, the “who did what” history blends together, and two-factor protection hangs off one phone. A separate account per person is better.
How long is the invitation valid? As long as you chose — 1, 3, 7, 14 or 30 days. After that the status becomes Expired and the link stops working. Details in Pending invitations.
Will the person get a reminder? No. There is no automatic reminder. If they go quiet, click Resend in the Invitations tab.
Troubleshooting
| Symptom | Cause | Fix |
|---|---|---|
| The email never arrives | Blocked by the provider, marked as spam, or the wrong address. The reason is not shown on screen. | Ask them to check spam. Then click Resend in the Invitations tab — it issues a new link and a fresh 7-day window. |
| ”This invitation is for a different account” | They signed in with an account whose email doesn’t match the invited one. | They click Sign out on that same screen and sign in (or register) with the exact address. |
| ”This invitation has expired” | The window has passed. | Resend from the Invitations tab. |
| ”This invitation link is invalid” | The link was broken while copying, or the invitation was cancelled. | Send a new invitation. |
| ”Couldn’t accept this invitation. Please try again.” | A temporary hiccup at acceptance. | Have them press Accept again. If it repeats, send a new invitation. |
| They accepted but don’t see the business | Membership is created a second or two after acceptance. | Have them reload. If it’s still missing after a minute, sign out and back in. |
| They sign in, but the Clients row errors | Their role lacks View booking clients. | Members → click their role label → switch the permission on → Save. |
What’s next
- What each role can do — which role to pick.
- Pending invitations — what happens while you wait.
- Staff vs. resource — a login versus a calendar column.
- Change or remove access — when something changes.