Invite & manage members
How to invite a person by email, change their role, deactivate or remove them.
This is the full life cycle of a colleague in Mountify: the three-step invitation, where they wait until they accept, how their rights are changed, and what happens if they leave. It all lives on one screen — Users & Permissions — split into three tabs that are important not to mix up.
The most common mistake: somebody who hasn’t accepted their invitation yet does not appear in the Members tab. They’re in the Invitations tab. If you’re looking for them under “Members” and can’t find them, that’s normal.
1. Open the team screen
The two routes are:
- The quick one: the business monogram tile (top of the narrow rail on the left) → Members.
- The long one: Workspace settings → the Users & Permissions tile.
The page has three tabs, each with a counter:
| Tab | What it holds |
|---|---|
| Members | The people who already have access. Counter = the active ones. |
| Invitations | Sent invitations not yet accepted (or expired / cancelled). |
| Roles & Permissions | The permission templates. |
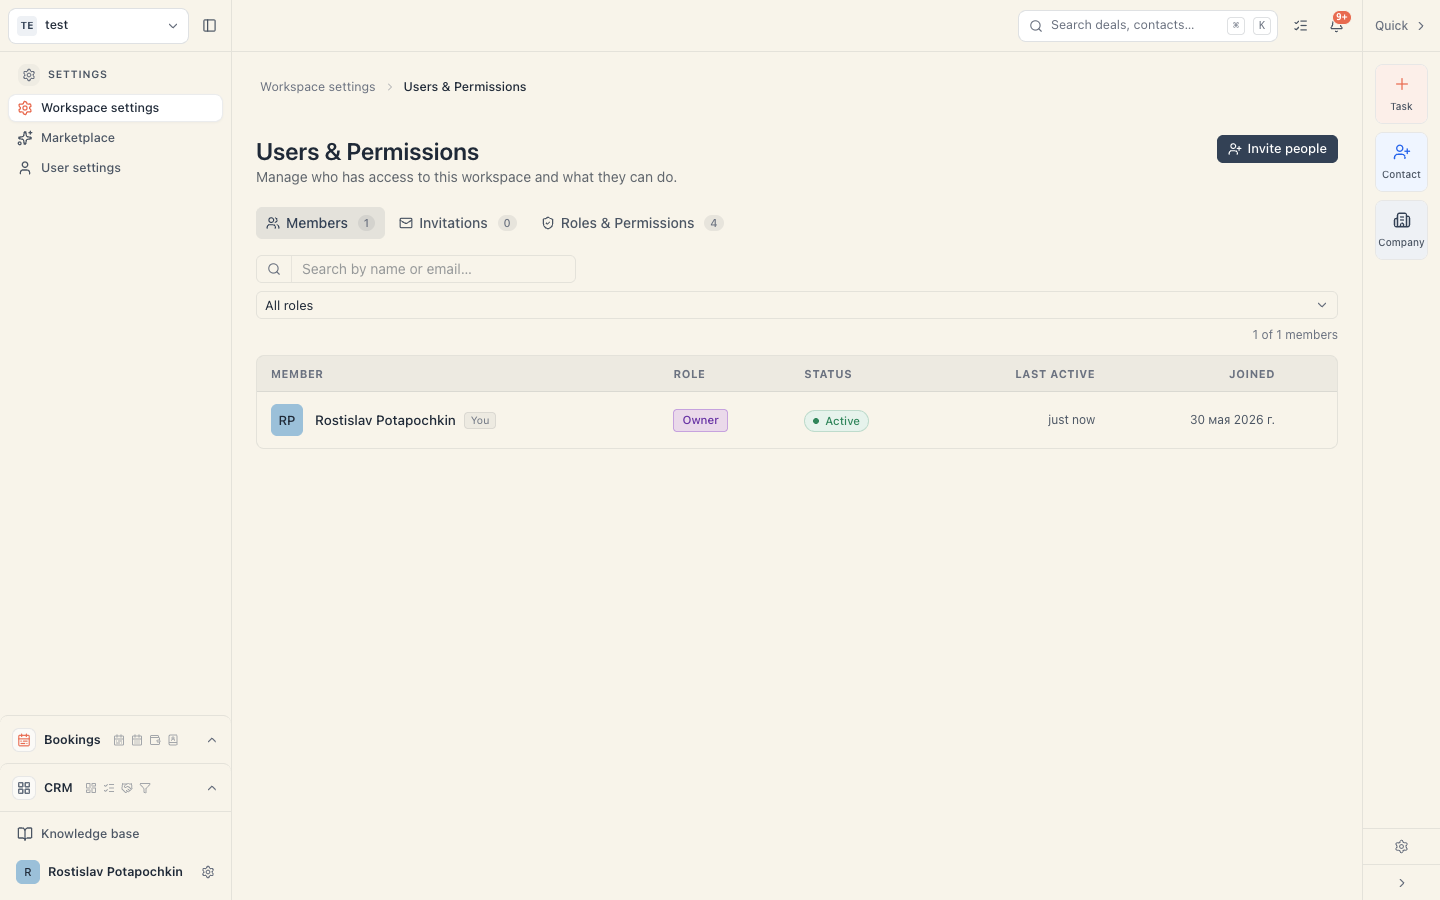
If the Users & Permissions tile isn’t in Settings, your role lacks the Manage members & permissions permission. Ask the owner to grant it.
2. Send the invitation — step 1 “People”
- Click Invite people at the top right (the button shows in the Members and Invitations tabs, but not in “Roles & Permissions”).
- A three-step wizard opens: People · Permissions · Review. The bar at the top reads “Step 1 of 3”.
- In the Who should we invite? field enter the emails. The hint says “One email per line, or comma-separated” — both work.
- Under the field each address appears as a chip. Neutral = valid, red = invalid. Invalid ones are simply ignored when sending.
- Bottom left tells you how many invitations are ready. Click Continue.
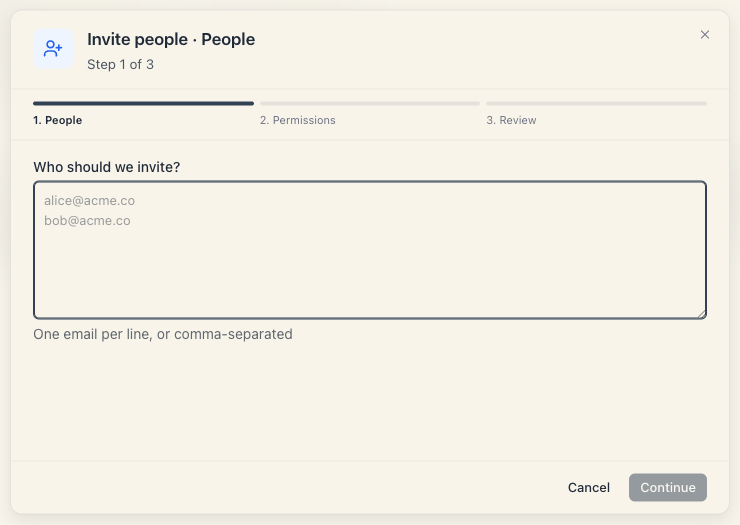
Technical limits worth knowing:
| Rule | Value |
|---|---|
| Maximum addresses per invitation | 50 |
| Addresses are lower-cased | yes — Ivan@… and ivan@… are the same person |
| Duplicate addresses in one field | merged into one |
3. Step 2 “Permissions”
Here you decide what the person can do. The heading is What can they do?, with the hint “Start from a preset or build a custom set from scratch.”
- The selector at the top left applies a ready template. Open it and pick a role — Member, Viewer, Admin, Owner, or one of your own roles. The checkboxes below fill in immediately.
- To the right of the selector sits a counter — “N permissions”.
- Below it are the two blocks: the Modules table (View · Add · Edit · Delete across seven modules) and the Special list of switches.
- You can tick any checkbox by hand. View is mandatory: without it the other three in the row are greyed out.
- The Invitation expires in field at the bottom accepts 1, 3, 7, 14 or 30 days. The default is 7 days.
- Click Continue.
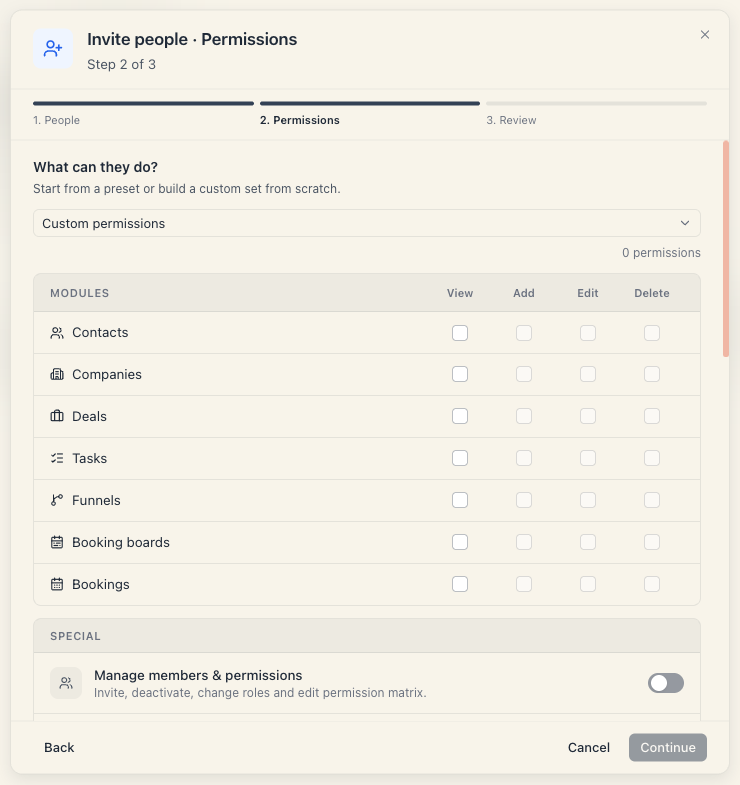
The Continue button stays disabled until at least one permission is selected. When the wizard opens, nothing is selected — you must apply a preset or tick at least one box.
You can’t grant more than you hold. If you pick a permission you don’t have yourself, the server refuses the invitation. The same applies to a preset that contains such a permission.
4. Step 3 “Review” and sending
The last step is a checklist:
| Row | What it shows |
|---|---|
| Recipients | Only the valid addresses |
| Based on | The name of the matching preset, or Custom (no preset) if the set is hand-made |
| Permissions | A short list per module + the special ones that are on |
| Expires | ”7 days after sending” |
| Sent by | You |
Click Send N invitations. A “Sent N invitations” message appears and the wizard closes.
Verify the result in the Invitations tab. The success message shows immediately, without waiting for the server’s answer. If the email is already invited or is already a member, the invitation is silently skipped — the new row simply won’t appear. The Invitations tab is the only reliable answer to “did it go out”.
5. What the recipient does
- They get an email with a link to the invitation.
- They open it and see “You’ve been invited to «Business name»” with the line “Sign in or create an account for … to accept this invitation.”
- They click Sign in / Sign up and go through registration (email → six-digit code → a password of at least 8 characters), or sign in if they already have an account.
- They come back to the “Join «Business name»” screen and click Accept.
- If their profile has no name yet, the Tell us your name block appears first, with First name (required) and Last name.
Only after they press Accept does the person appear in the Members tab with status Active. It takes a second or two to show up.
The full detail of that side of the process is in Give staff a login.
6. What the members list shows
The Members tab is a table with these columns:
| Column | Content |
|---|---|
| Member | Avatar, name, with email and job title underneath. Next to your own name sits a You chip. |
| Role | A label with the matching role’s name, or Custom. Hover it for the Active permissions list. |
| Status | Active (green dot) or Deactivated (the row is dimmed). |
| Last active | ”2 hours ago”, “3 days ago”, or a date. |
| Joined | A date. |
Above the table there’s a Search by name or email… box, a role filter (All roles / each role / Custom) and a “N of M members” counter.
7. Changing a role
Changing a role is NOT in the ⋯ menu. Here’s how it works:
- In the Members tab find the person’s row.
- Click the label in the “Role” column — it is a button.
- A Permissions · Person’s name dialog opens.
- Top left there’s a selector. Open it and pick a role — the checkboxes fill in from the template. Or tick the boxes by hand.
- Click Save.
What to expect:
- The change takes effect immediately, but the access cache lives for up to half a minute. If your colleague doesn’t notice the difference, ask them to reload.
- After a hand edit the row’s label usually becomes Custom, even if you applied a preset. That’s normal — the explanation is in Roles & permissions.
- Changing a role deletes nothing: the person’s bookings, payments and notes stay.
The only row without a clickable label is your own — you can’t change your own permissions. Ask another person with Manage members & permissions.
The owner’s label opens too — leave it alone. Taking permissions away from the owner is not blocked by the screen, and it can leave the business with nobody able to manage the subscription. If the owner’s role has to change, contact support.
8. The ⋯ menu — what’s in it
At the end of each row sits a ⋯ with exactly two actions:
- Deactivate (or Reactivate if the person is deactivated);
- Remove from workspace (in red).
There is no “Change role”, no “Transfer ownership”, no “Resend”. Full instructions for deactivating and removing are in Change or remove access.
The menu does not appear on your own row.
9. Ownership does not transfer
Mountify has no ownership transfer. If the owner is leaving the business:
- their row can’t be deactivated (“You don’t have permission for this action.”);
- their row can’t be removed (the same message);
- no button exists that makes somebody else the Owner.
Don’t “solve” this by editing the owner’s permissions. It doesn’t turn them into an ordinary member, and it can lock the whole business out of its subscription. Contact support instead.
Common questions
I invited someone but I can’t see them in “Members”. They’re in the Invitations tab with status Sent. They only move to “Members” after pressing Accept.
Can I invite several people with different rights at once? Not in one invitation — the permissions in the wizard apply to every recipient. Send a separate invitation per group.
Can I change an invitation’s email? No. Cancel it and send a new one to the right address.
Will I be notified when somebody accepts? No. Check the Invitations tab — the status turns to Accepted.
How many people can I invite? There’s no cap on people and you don’t pay for them. See Does adding a teammate cost extra?.
How do I invite someone to just one of my boards? You can’t. See Can I limit someone to one salon?.
Troubleshooting
| Symptom | Cause | Fix |
|---|---|---|
| The “Sent N invitations” message appeared but there’s no new row under “Invitations” | The address is already a member or already has a pending invitation — Mountify silently skips it | Check the Invitations tab and the Members list for the same address |
| The invitation never arrived | The email may have been blocked by the provider or landed in spam. The reason is not shown on screen. | In Invitations click the Resend icon — it issues a fresh link and a fresh expiry |
| ”You don’t have permission for this action.” when sending | You picked a permission you don’t hold yourself | Untick the offending boxes, or ask the owner to send the invitation |
| I can’t click my own role label | You can’t edit your own permissions | Ask another person with Manage members & permissions |
| The colleague accepted but doesn’t see the business | Membership materialises a second or two after acceptance | Ask them to reload. If it’s still missing after a minute, sign out and back in |
| ”by —” in the sender column | A known cosmetic gap: the sender’s name isn’t resolved in the list | Harmless — the status and dates are correct |
What’s next
- Pending invitations — the Invitations tab in detail.
- Give staff a login — what the invitee sees and does.
- Change or remove access — deactivating and removing.
- Roles & permissions — what every checkbox means.