Invite your team
Add colleagues to your board and set what each of them can do.
Your colleagues get into Mountify by invitation: you send an email, the person creates an account (or signs into their existing one), accepts the invitation, and appears in your team with exactly the rights you gave them.
Before you start, three facts that head off the most common questions:
- Access is workspace-wide. You can’t invite someone “for one salon only”. See Can I limit someone to one salon?
- Users are free. Your plan caps bookable spots (active bookable resources), not the number of people with a login. See Does adding a teammate cost extra?
- A login ≠ a resource on the schedule. A master can take bookings without ever having an account; conversely, your accountant can have an account without being a column on the schedule. See Staff vs resource.
Where the team is managed
Navigation: Settings → Workspace settings → Users & Permissions.
Shortcut: the monogram tile at the top of the narrow rail → Members.
The page is titled Users & Permissions and has three tabs, each with a counter:
| Tab | What’s in it |
|---|---|
| Members | People who have already accepted and are working in the workspace |
| Invitations | Invitations you’ve sent that haven’t been accepted yet — this is where they wait |
| Roles & Permissions | The built-in roles and your own |
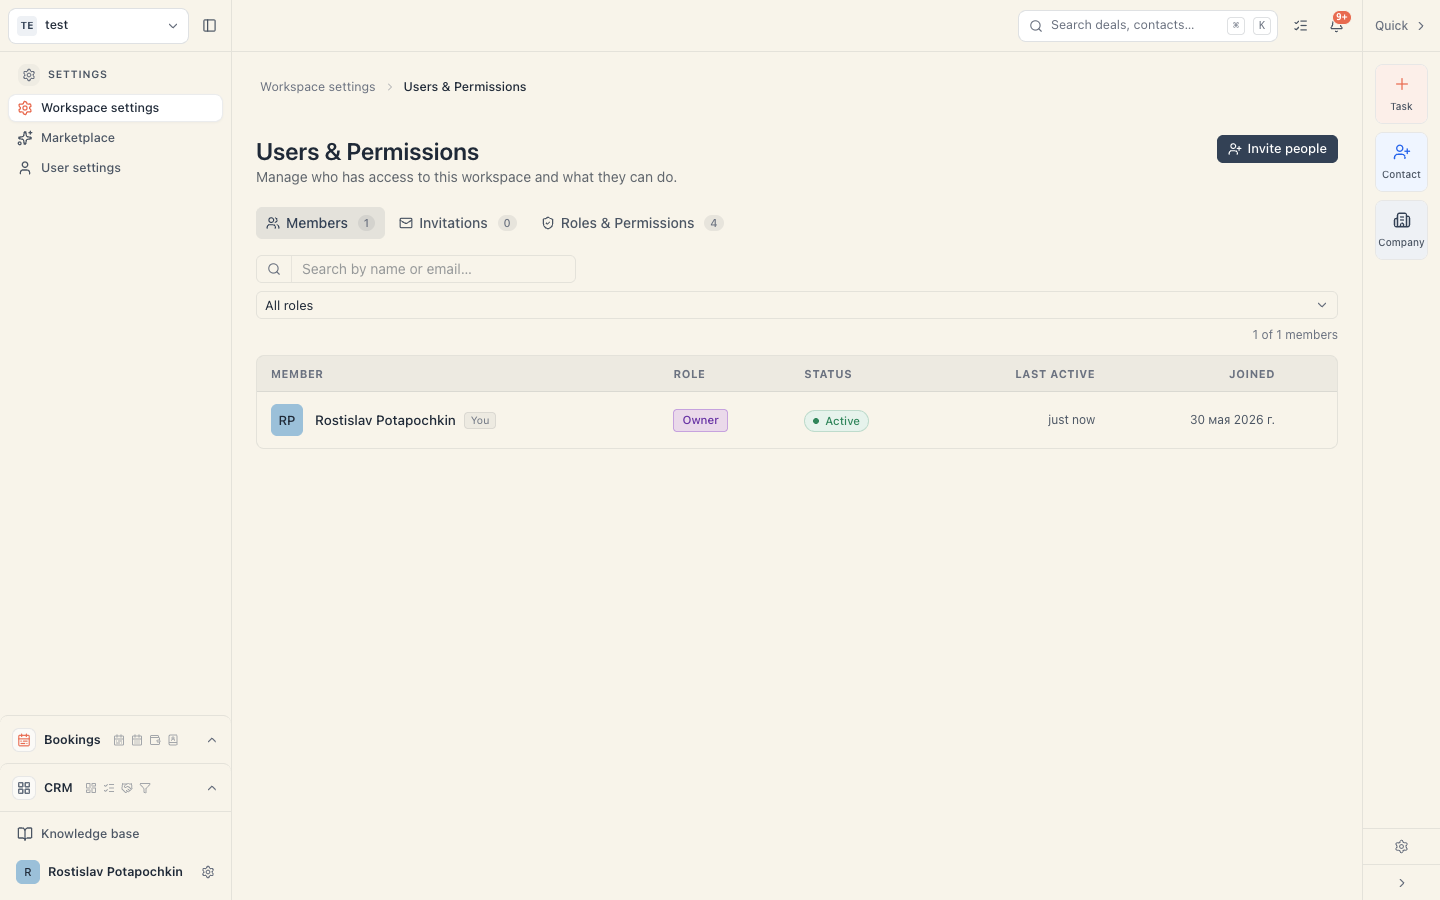
The most common confusion: someone you’ve just invited will not appear under “Members”. They only land there after accepting. Until then, look under Invitations. See Pending invitations.
If you can’t see the “Users & Permissions” tile in settings, or the page tells you “You’re signed in as … — view-only access.”, you don’t have the Manage members & permissions permission. Ask an Owner or Admin.
How to invite — step by step
The Invite people button is at the top right (it’s there on both the Members and Invitations tabs; on Roles & Permissions it isn’t). The dialog has three steps and a “Step N of 3” counter.
Step 1 — People
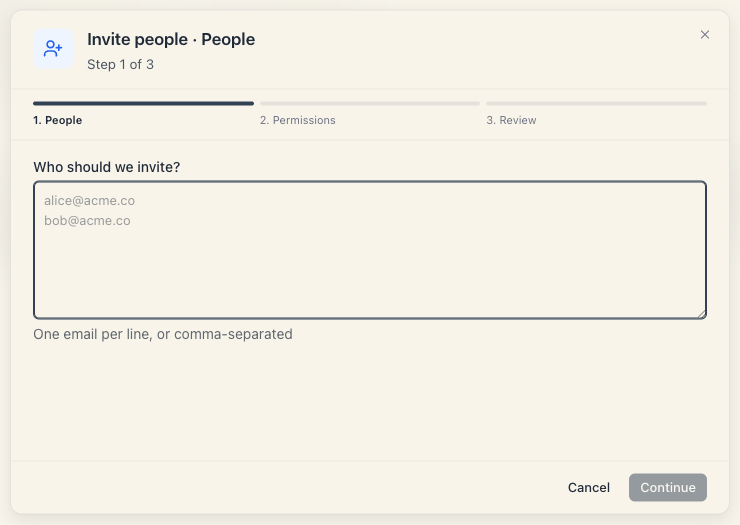
- In Who should we invite?, type the emails. The hint says “One email per line, or comma-separated” — both work.
- Under the field each address appears as a chip. Valid ones are neutral, invalid ones red. Invalid ones are simply ignored when sending.
- Once there’s at least one valid address, the footer reads “N invitations ready”.
- Press Continue. With no valid email the button stays disabled.
An invitation is bound to the exact address. If the person signs in with a different email they’ll see “This invitation is for a different account” and will have to sign out and back in with the right one.
Step 2 — Permissions
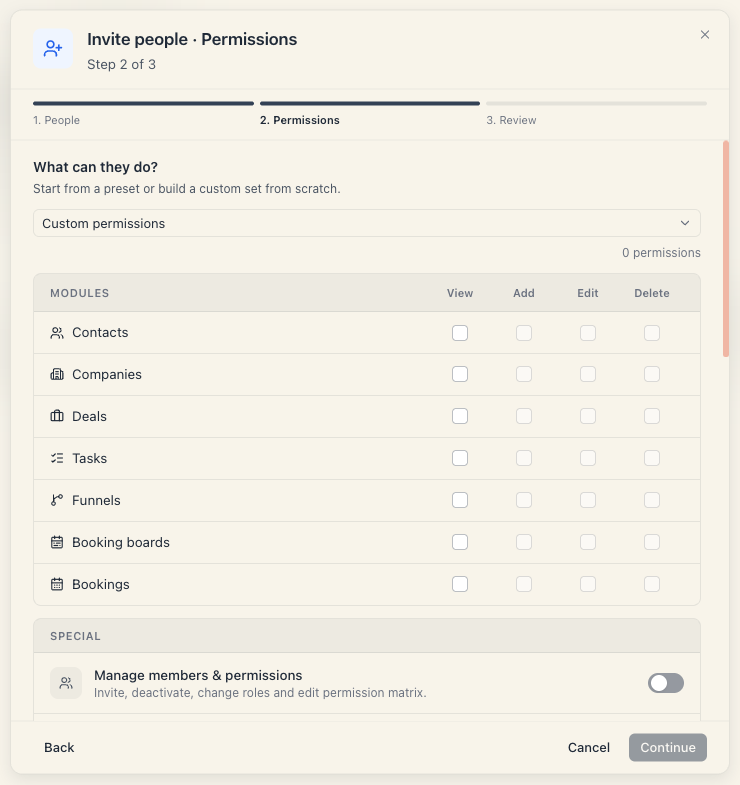
The heading is What can they do?, with the hint “Start from a preset or build a custom set from scratch.”
- Fastest route: Apply preset → pick from the list (Member, say). The matrix fills in at once.
- The matrix has two halves:
- Modules — a row each for Contacts, Companies, Deals, Tasks, Funnels, Booking boards, Bookings, and a column each for View, Add, Edit, Delete.
- Special permissions — individual switches, each with an explanation. The salon-relevant ones live here: View booking clients, Edit booking clients, Ban booking clients, Manage loyalty rules, Manage landing banners, Install integrations, Use integrations, Manage workspace settings, Manage members & permissions.
- If the set matches a built-in role exactly, the header says “Matches «…» preset”; if not, “Custom permissions”.
- Under the matrix is Invitation expires in with 1 day, 3 days, 7 days, 14 days, 30 days. The default is 7 days.
- Continue. If nothing is ticked, the button stays disabled.
Practical note: the Member role does not include viewing booking clients by default. If you’re inviting a receptionist who needs client phone numbers, tick View booking clients here. Ready-made recipes are in Build a custom role.
Step 3 — Review
Five lines for a final check: Recipients, Based on (the role name, or “Custom (no preset)”), Permissions (a summary of what’s ticked), Expires (“7 days after sending”) and Sent by (you).
Press Send N invitations. A “Sent N invitations” confirmation appears and the rows show up under Invitations.
What the invitee does
This is the second half of the process, and worth knowing so you can help over the phone.
- They get an email with a link and open it. They see You’ve been invited to «…» with “Sign in or create an account for to accept this invitation.”
- They press Sign in / Sign up. If they’re new, they go through the same three screens — Create account → Check your email → Set password (see Create your account).
- They return to the invitation page, now signed in, and see Join «…».
- If they have no name on file, a small Tell us your name form appears here with First name (required) and Last name.
- They press Accept. (Decline sits next to it.)
- They enter the workspace. Occasionally there’s a one- or two-second wait while access is written — that’s normal.
Accepting is an explicit action. Clicking the link does not join them automatically. When a colleague says “nothing happened”, nine times out of ten they reached this screen and didn’t press Accept.
The built-in roles
The Roles & Permissions tab.
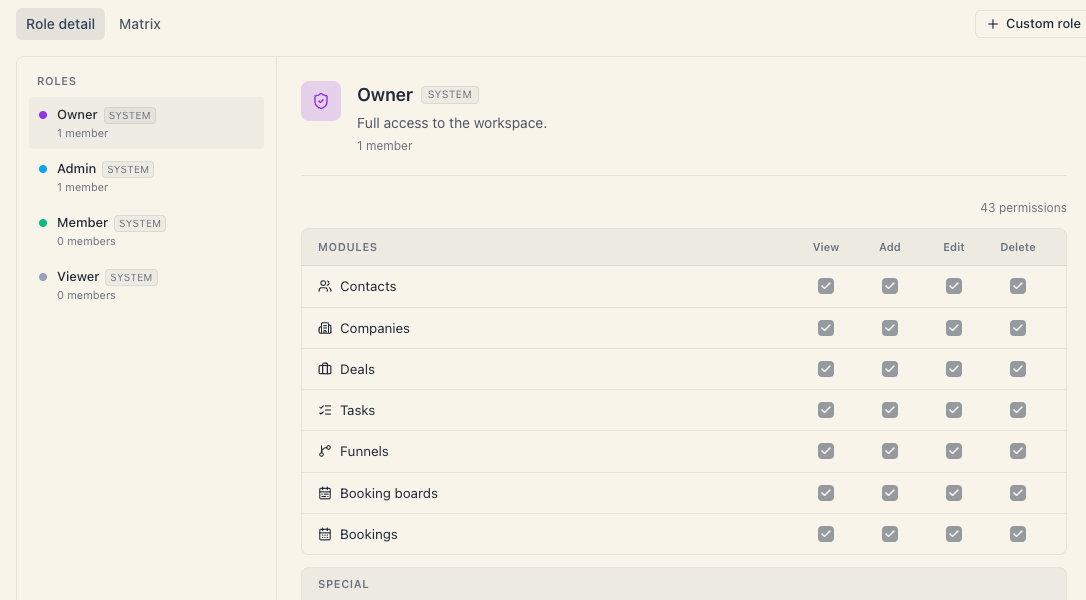
Four roles ship built in (they carry a system label): Owner, Admin, Member, Viewer. Each shows how many members hold it.
Don’t assume “each role has its own permission set” in the convenient sense. Two facts matter: Owner and Admin hold an identical full set (Admin is not a restricted Owner), and Owner’s permissions cannot be changed (“Owner permissions can’t be modified.”). What each role can really do is in What each role can do.
If no role fits, build your own: New custom role — name, description, colour and Based on an existing role to copy and then adjust. See Build a custom role.
Once someone is in the team
On the Members tab each row shows: the person (name, email, job title), Role, Status (Active / Deactivated), Last active and Joined.
- Change their rights — click the role chip in the row (not the ⋯ menu). A Permissions ·
dialog opens with the same matrix and a Save button. - The ⋯ menu at the end of the row — Deactivate (or Reactivate) and Remove from workspace. Both ask for confirmation; removal can’t be undone.
- There is no ⋯ menu on your own row or on the Owner’s row. The owner cannot be deactivated or removed.
There is no ownership transfer. If the owner is leaving the business, the interface has no answer — contact support. See Change or remove access.
If a row shows the name ”—”, the person accepted just now and their profile hasn’t synced yet. Refresh in a minute.
Troubleshooting
| Symptom | Cause and fix |
|---|---|
| The invitee isn’t under Members | They haven’t accepted. Check the Invitations tab — the status will be Sent. |
| The invitation says Expired | The window ran out. From the row’s ⋯ menu pick Resend. |
| ”This invitation is for a different account” | They signed in with another email. They must sign out and back in with the invited address. |
| ”This invitation link is invalid” | The link was mangled in copying, or the invitation was removed. Send a new one. |
| ”This invitation was cancelled” | Somebody pressed Cancel under Invitations. Send a new one. |
| The colleague signs in but can’t see Clients | View booking clients is missing. Click their role chip and tick it. |
| I can’t see the Invite people button | You lack the Manage members & permissions permission, or you’re on the Roles & Permissions tab. |
| I can’t change the role on one row | It’s your own row or the Owner’s — both are protected. |
Common questions
How many people can I invite? There’s no plan cap on the number of users.
Can two people share one account? Technically yes, but don’t: you lose the “who did what” trail and you can’t give them different rights.
Can I invite someone who isn’t on the schedule? Yes. A login and a resource on the schedule are entirely separate things.
If I deactivate someone, do I lose their history? No. Their bookings and actions remain; they simply lose access.
Can I invite someone read-only? Yes — the Viewer role, or a custom role with only the View columns ticked.
What’s next
- Pending invitations — the Invitations tab in detail.
- What each role can do — what each of the four roles actually sees and does.
- Build a custom role — recipes for reception, a master, an accountant.
- Can I limit someone to one salon? — the short answer and the workarounds.