The setup wizard
The new-board wizard: pick a preset for your trade, tick ready-made resources and services, and name it.
Mountify has two different wizards and people mix them up constantly. The first one runs at registration and creates your workspace (language, name, industry, country…) — that one is covered in Create your account & workspace. This article is about the second: the New board wizard, which creates one board — the bookable place with its own schedule, its own services and its own public page.
The wizard is a four-step dialog: preset → what to add → name → pin on the map. After it, if you ask for it, a separate guided setup of four more steps follows. Nothing is created behind your back — you decide what goes in.
Where it opens
The wizard opens automatically right after you create your workspace. You can also open it by hand, two ways:
- Boards (left rail, group Across boards → All boards) → the New board button top right, or the dashed New board card at the end of the grid.
- Dashboard (the Booking overview page, same group in the rail) → the New board button.
The dialog has a close cross top right — up to and including step 3, leaving it behind leaves nothing behind.
1. Create a new board (pick a preset)
The dialog’s title is Create a new board.
- Across the top is a row of pill buttons by trade: Beauty, Wellness, Health, Fitness, Sports, Education, Entertainment, Pets, Services, Home. Click yours.
- Below them the concrete preset cards for that trade appear — in Beauty, for example: Hair salon, Barbershop, Nail studio, Beauty & cosmetology, Brow & lash, Tattoo & piercing.
- At the very bottom, detached from the trades, sits the Custom card badged Empty.
- Clicking a card moves you to the next step immediately — there’s no “next” button on this step.
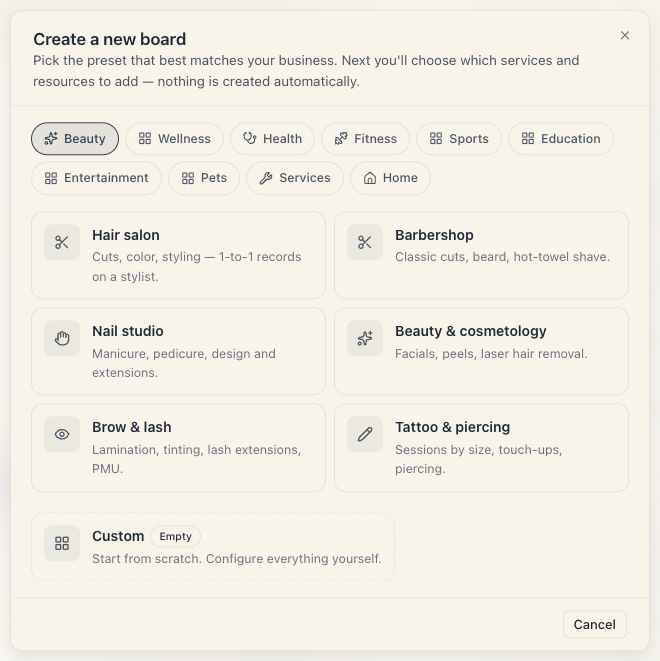
What the preset does:
- Offers you a ready set of resources and services on the next step (offers only — nothing is created until you tick it).
- Sets the board type and the starting colour of the public page (changeable later at Setup → Public site).
- Renames the words in the interface for your trade. In a tattoo studio a “service” becomes a Session and “staff” becomes an Artist. That’s why this help centre says “Services” while your screen may say “Sessions” or “Treatments”.
- Pre-fills the board name with the preset’s name — you change it on step 3.
If a trade isn’t available yet it’s labelled Coming soon. If your trade isn’t listed, take Custom; the Custom preset skips step 2 (there’s nothing to offer) and takes you straight to the name.
2. Pick what to add
The title changes to Pick what to add. The dialog has two columns:
| Column | What’s inside | What it means |
|---|---|---|
| Resources | People, rooms, equipment — “who and what the customer books” | Each tick creates a resource kind (e.g. “Masters”, “Chairs”), not a specific person |
| Services | Services or sessions with a sample duration and price | Each tick creates a service. Under the name you see minutes and price; free ones say Free |
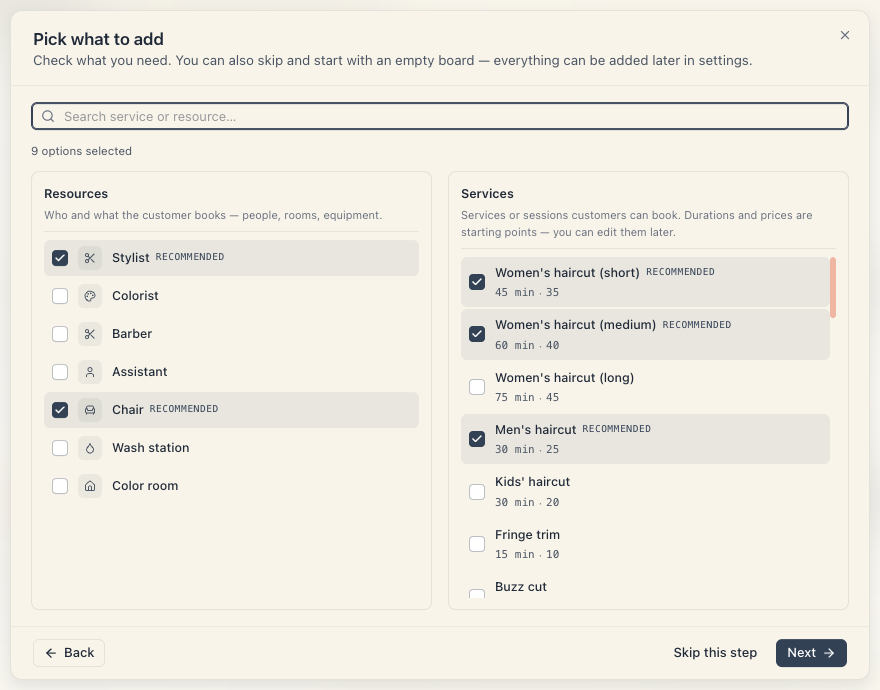
How to work here:
- Recommended rows are already ticked and labelled Recommended. Untick whatever you don’t need.
- The search box at the top (Search service or resource…) filters by name and by hidden keywords — type “colour” or “massage” and the list narrows. With no results it says “No matches for this search.”.
- A counter appears above the columns — “N options selected”.
- At the bottom: Back, Skip this step (nothing is created — you start with an empty board) and Next.
Important detail: a service is only created if every resource kind it requires is also ticked. Untick “Chairs” while a service needs a chair and that service simply won’t be created — that way you’re never left with services that can’t be booked. If something’s missing afterwards, add it by hand from Catalog → Services.
Prices and durations here are starting values, not final ones. Edit them calmly later.
3. Name your board
The title is Name your board. Above the fields is a small card showing the chosen preset and how many options you ticked.
| Field | Required | Limit | What it’s for |
|---|---|---|---|
| Board name | Yes — Next stays disabled without it | 200 characters | Shown in the left rail, in the Boards list, and as the public page’s title (changed separately later) |
| Short description | No | 500 characters | For your team only — address, focus area; helps you tell boards apart |
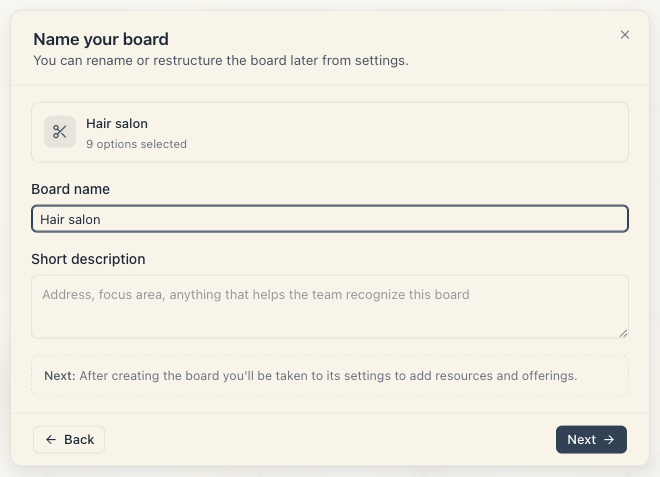
The fields show a character counter as you approach the limit. If typing stops, you’ve hit the ceiling.
This is where creation happens. Press Next on this step and the board is genuinely created: along with it, the ticked resource kinds, the ticked services and one primary location named after the board. That’s why the next step has no Back button — there’s nowhere back to go.
If creation fails you’ll see “Board wasn’t created — try again.” and you stay on the same step.
4. Pin your branch on the map
The last step is optional and sets the two things that are most annoying to fix later: the map address and the time zone.
- Type an address into the field — the pin drops automatically onto the suggestion you pick. You can also drag it.
- Time zone fills itself in from the pin (until you touch it by hand). It decides which day counts as “today” for the schedule and for the till — don’t leave it wrong.
If you touch nothing and have neither address nor pin, the location keeps just the board’s name — add an address later from Catalog → Locations.
The three buttons at the end
Here’s the distinction that trips most people up:
| Button | Saves the address & time zone? | Where it takes you |
|---|---|---|
| Skip | No — the pin and time zone are not saved | Setup → Settings of the new board |
| Create — I’ll do it myself | Yes | Setup → Settings of the new board |
| Create & guide me | Yes | The four-step guided setup (below) |
If you typed an address and time zone, do not press Skip — take one of the two “Create…” buttons. The board is already created either way; the only difference is whether the pin is saved and where you land.
If saving the pin fails you’ll see “Map pin wasn’t saved — try again.”. The board still exists; redo the address from Catalog → Locations.
The guided setup (after “Create & guide me”)
This is a separate full-screen surface that covers the usual interface. Top left it says Setting up and the board name; top right there’s Skip onboarding. At the bottom: Back, Skip this step, Continue.
There are five tabs: four working steps and a final summary.
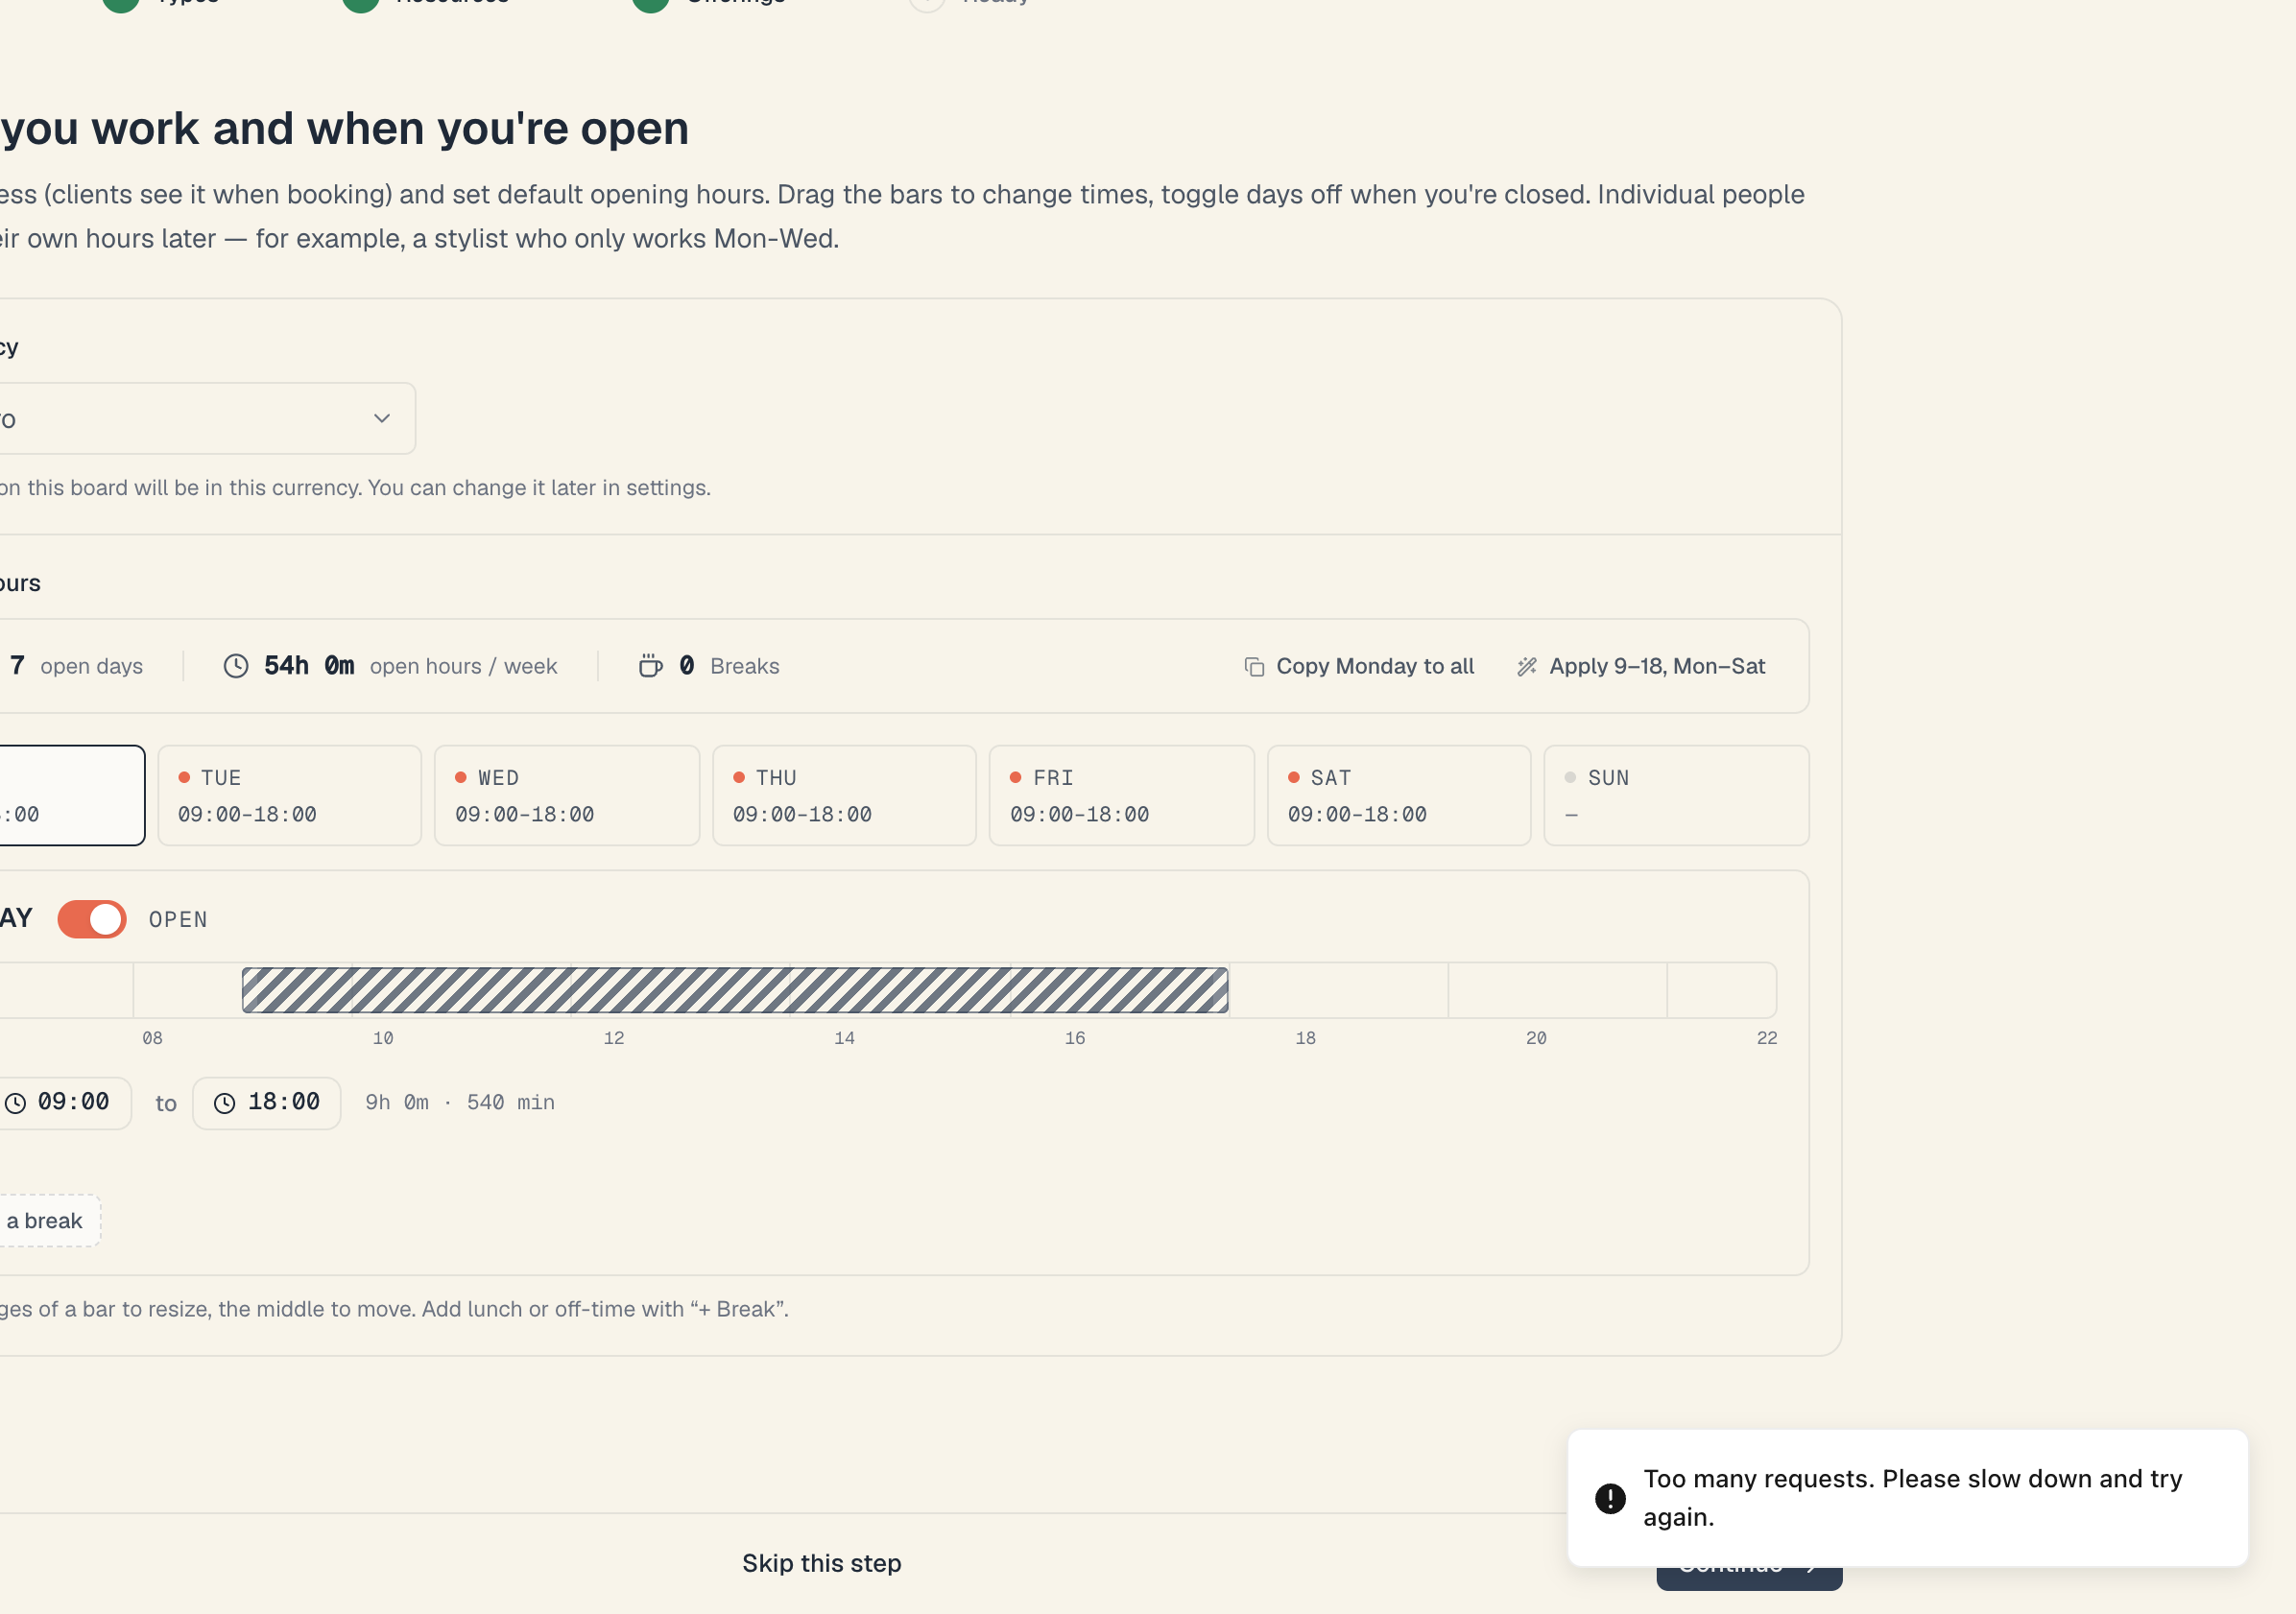
- Hours (Step 1 of 4) — “Where you work and when you’re open”. Three things live here: Address (clients see it when booking), Working hours (drag the bars; the edges resize, the middle moves the whole block; ”+ Break” adds a lunch break) and Currency — every price on this board will be in it.
- Types (Step 2 of 4) — “What can clients book at your business?”. Pick resource kinds from ready templates: Masters, Instructors, Doctors, Teachers, Rooms, Courts, Cabinets, Cameras, Equipment, or Add a custom kind. One of them is Primary — it defines the columns on the schedule.
- Resources (Step 3 of 4) — the actual people and places. There’s quick-add: type a name and press Add. Colour is auto-set and hours follow the business; click a name to fine-tune.
- Offerings (Step 4 of 4) — what the client picks. Name, Duration, the Group (multiple seats) switch with a Seats field, and “What does this service need?” — which resource kinds it requires. For pricing and anything advanced there’s a link: Need pricing or advanced options? Open the full editor.
- Ready — a summary with three numbers (resource kinds, resources, offerings) and three links: Your booking page is live — view it, Open schedule, Go to settings.
If something’s still missing, instead of “All set” you’ll see Almost there and a list of the gaps — for example “Add at least one service” or “Add at least one ‘Masters’ — services can not be booked without it”, each with a Fix button.
The guided setup remembers where you stopped. Leave halfway through and the next time you open the board it drops you back in at the same step. If you don’t want that, press Skip onboarding — that’s how you say “enough”, and the app stops sending you back.
After creation
- A new board is public immediately — the Online booking switch is on by default. If you’re not ready to be seen, turn it off at Setup → Public site.
- In the Boards list your board carries one of three statuses: Live, Not bookable (published, but not a single service can be booked) or Draft (online booking is off).
- A setup-checklist pill appears bottom right — it disappears on its own once everything required is done.
Common questions
Can I change the preset later? Not directly. The preset is a choice made at creation time. Everything it created (kinds, services, name, colours) can be renamed and deleted freely, so in practice you reshape the board. If the difference is large, a fresh board is cleaner.
Can I step back after creation? Not in the dialog — step 4 has no Back, because the board is already on the server. Everything is editable afterwards from settings.
How many boards can I create? There’s no cap on the number of boards. What’s capped is bookable spots (active bookable resources) and locations, and those are counted across the whole workspace. See Your plan’s bookable-spots limit.
Why is the service I ticked missing? Because you didn’t tick a resource kind it requires. Add it by hand from Catalog → Services.
I can’t find the guided setup again.
It lives at the board’s address ending in /onboarding and opens itself until it’s finished or explicitly skipped. After that, use the checklist pill bottom right and the usual pages under Catalog and Setup.
What’s next
- Go live in one evening — finishes exactly what the wizard started.
- What a board is — what a board contains and when you need several.
- Tour of the admin — where Catalog, Money and Setup are.
- Working hours — hours in detail, including per location.