Create a service
The editor step by step: type, name, duration, price and which resources it needs.
The service editor is the most important screen in Mountify. It decides what the client sees, what they pay and — the most commonly underestimated part — whether the service shows any free times at all. Here we walk every section in order, field by field: what to type, what it affects, what happens if you leave it empty, and which error messages you can hit.
The path is Catalog → Offerings → + Service. To edit an existing one, click the pencil icon on its card (or Edit offering from its page).
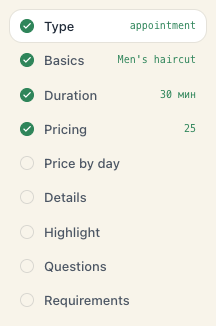
How the screen is laid out
Three columns:
- Left — the section column (titled Sections). Each row is a section, with a short summary under its name (“60 min”, “80”, “2”). The dot on the left turns green when the section is genuinely filled in, and red when the last save attempt failed exactly there. The arrow at the top (Collapse / Expand) shrinks the column to icons — the choice is remembered across editors.
- Middle — the form. Sections are numbered and run one after another; you don’t have to fill them in order.
- Right — the live preview (Preview). It shows how the service card will look, where it will appear (Appears on: Home, Services, Classes, Rentals), the quick facts (Duration, Price, Performed by, Where, Badge) and the step chain How customers book it. At the top you get either Ready to book or Almost ready; with “Almost ready” the missing piece is spelled out (e.g. “Give it a name so customers can find it.”).
At the top of the page you have Back to offerings, a tour button and the pair Cancel / Create offering. When editing, the button reads Save changes, and while saving — Saving….
Nothing is lost when you leave. With unsaved changes, clicking Back to offerings, Cancel or a menu row pops a confirm asking whether to discard them. Say “keep editing” and you carry on.
1. Template — the type decides the whole booking flow
The first section is Template, described as “Choose the offering type — determines the booking flow.”
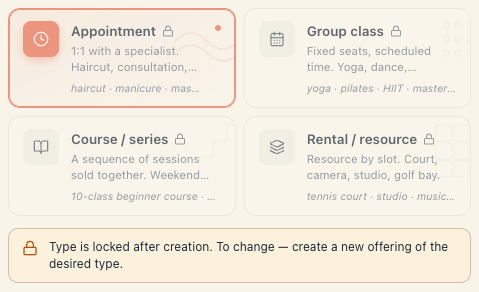
You see three cards (not four):
| Card | What it does | Examples from the hint |
|---|---|---|
| Appointment | 1:1 with a specialist. The client picks a day and an exact free time. | haircut · manicure · massage · consultation |
| Group class | Fixed seats and a schedule. The client joins a scheduled session. | yoga · pilates · HIIT · master-class |
| Rental / resource | A resource by slots. The client picks from–to. | tennis court · studio · music room |
“Course / series” is absent at creation — the course purchase flow isn’t finished. It only appears when editing an older service that is already a course.
Important: the type locks after creation. In edit mode the cards go grey, with a padlock and the note “Type is locked after creation. To change — create a new offering of the desired type.” If you picked the wrong type, create a new service and delete the old one.
The remaining sections change with the type. What follows describes Appointment; the differences for classes and rentals are flagged where they matter.
2. Basics — name and description
Section Basics, “What the customer sees first.”
- Name (required, up to 120 characters). The hint reads “What the customer sees on the card and at checkout. Shorter is better.” Write as a client, not as a bookkeeper: “Women’s haircut”, not “Haircut women + blow-dry (cat. 2)”. Leave it empty and the save fails with Service name and the explanation “Give your service a short name customers will see… It can’t be empty and is limited to 120 characters.”
- Description (optional, up to 2000 characters). The hint reads “2-3 sentences. What’s included, what’s not. Don’t put prices here — they’re below.” It shows under the name on the public card, truncated to one line in the list and in full on the service page.
These two fields are all the client reads before pressing the button. If the service has conditions (“short hair only”), put them in the description — not as a surprise on the chair.
3. Appointment settings — how much calendar time it takes
For Appointment the section is Appointment settings, “Duration and capacity for a 1-to-1 session.”
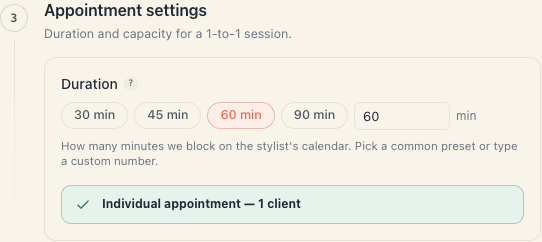
- Duration — four quick chips (30, 45, 60, 90 min) plus a field for an exact number. Type anything outside the four and a small custom marker lights up. The minimum the server accepts is 5 minutes — below that the save fails with Duration / “Set how long the service takes, in minutes — at least 5.”
- Under the field sits a green bar: Individual appointment — 1 client. It tells you capacity is fixed at one — for more seats you need the Group class type.
What the duration affects:
- That many minutes are blocked on the resource’s calendar.
- The client is only offered a start time where the whole service fits inside working hours and doesn’t overlap another booking or a break. A longer service has fewer possible starts in a day.
- In the By duration pricing mode it also feeds the amount.
The editor’s own tooltip puts it precisely: “Duration covers prep + service + wrap-up. The closer to reality the better — the next slot can’t be booked until this one ends.”
There is no separate buffer field between clients. If you need 10 minutes to clean up, either build them into the duration or put breaks in the resource’s schedule — see Breaks & lunch.
For a group class the section is Class settings with a second field — Capacity (seats) (“Maximum number of participants per session.”). The minimum is 2; if you arrive from Appointment with capacity 1, the field lifts itself to 12 so you can’t save a class with one seat. This is also where Recurring schedule lives (days, start time, weeks ahead — up to 26) plus the Create a class series button.
For a rental the section is Rental settings — slot length, minimum and maximum slots per booking. Detail in Rental: slots & price.
4. Pricing — how much and how it’s paid
Section Pricing, “How customers pay for this offering.” (For a rental this section is not rendered — a rental carries its price per slot in its own section.)
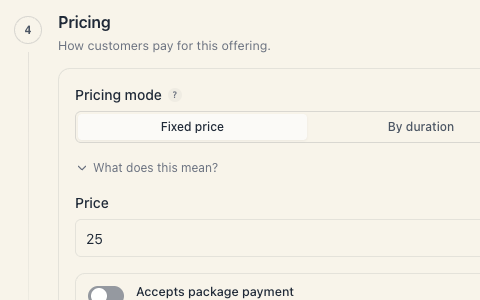
- Pricing mode — a segmented control with two options:
- Fixed price — “One fixed rate regardless of duration.”
- By duration — “Price is multiplied by the booking duration.” The field becomes Price per hour with the note “Total amount is calculated from the duration.”
- The What does this mean? link opens the same explanation inline.
- Price — the number. The currency is fixed board-wide and isn’t picked here; it’s set once in Setup → Settings. See Your venue’s currency.
- Accepts package payment — a switch. “Regardless of pricing mode, clients can also pay with a package.” If the salon sells memberships or punch cards, turn it on — otherwise a client with a valid package pays twice. See Packages overview.
Older services created when Free and Package only modes still existed open as Fixed price. The first save migrates them for good.
A free service is made with Fixed price and a price of 0. On save you get the question Make this service free? — “No price is set, so customers will be able to book it for free. Are you sure?” with Yes, it’s free and Back to price. That’s a deliberate brake, not an error.
Deposit & prepayment
Inside a framed block in the same section, titled Deposit & prepayment:
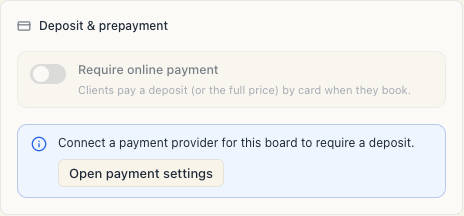
- Require online payment — the switch. The help reads “Clients pay a deposit (or the full price) by card when they book.”
- What to charge — Deposit or Full price.
- With Deposit: Deposit amount — Percent or Fixed — and the matching field (Percent of price (%), 1–100, or Deposit amount).
- Refund on cancellation — Non-refundable, Always refundable or Refundable before a cutoff; the third one reveals Refund cutoff (hours before start).
The switch is greyed out while the board has no active payment connection. In that state you read “Connect a payment provider for this board to require a deposit.” with an Open payment settings button.
If a deposit was already on and the connection later dropped, the warning is different: “This board’s payment connection is inactive. Reconnect it, or turn the deposit off, to save.” — and the save really is refused, with Payments not connected.
Full detail (who refunds, what the client sees) is in Deposits & prepayment and Connect Stripe.
5. Price by day & time — surcharges and discounts
Section Price by day & time, “Surcharges or discounts based on the day and time.”
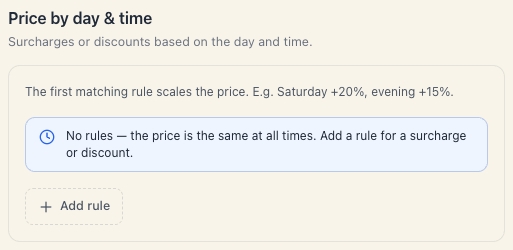
Empty it reads: “No rules — the price is the same at all times. Add a rule for a surcharge or discount.” The Add rule button creates a row with these fields:
| Field | What it does |
|---|---|
| Days | Mon–Sun chips. “No selection = every day.” |
| Only at a specific time | switch; off = “Otherwise the rule applies all day.” On reveals From / To (15-minute steps) |
| Percent | −100 to +200. “Surcharge or discount: from −100% to +200%.” |
| Label (optional) | an internal name, e.g. “Weekend evening” |
| Trash icon | removes the rule |
Under each row you get a one-line summary (“Sat, Sun · 18:00–22:00 · +20%”) and a live price example: the old amount struck through, an arrow, the new amount.
Rules do not stack. The first matching rule applies, and that’s it. The order in the list is the priority — and the editor has no drag handles: new rules append at the end. If you need a more specific rule to come first, delete the broader one and re-add it so the order comes out right.
If the service is in a mode that can’t carry rules, instead of the fields you see “Available only for a paid price (fixed, by duration, or rental).” Full detail — Pricing & day/time modifiers.
6. Public-page details
Section Public-page details — “Photos, what’s included, tags and policy — everything the customer sees when browsing.”
Fields in order:
- Cover image — a single photo, “Shown on the public services list. Falls back to the first gallery photo.” If a gallery already exists, a row “Or use a gallery photo:” appears with small pickable thumbnails.
- Cover photos — the gallery. “The first photo is shown the largest.” Up to 12 photos; the accepted formats are PNG · JPEG · WEBP · GIF up to 5 MB.
- What’s included — a bullet list. Type and press Enter (or a comma). “What’s in the price. Bullet list shown on the offering card.”
- Search tags — the same kind of input. “Keywords for filtering — customers can narrow their search by these.”
- Cancellation policy — free text, “What the customer should do if they need to cancel. Shown before they book.”
If the board uses a trade-specific preset, extra fields are appended at the bottom (for a hair salon — stylist tier, who it suits, hair length, long-hair surcharge, product line; for beauty — area, treatment type, skin type and so on).
The cancellation policy is text, not a rule. It’s shown to the client, but it cancels nothing automatically and does not govern deposit refunds — that’s the Refund on cancellation field in the Pricing section.
Full detail — Photos & details.
7. Highlight — a chip on the public card
Section Highlight: “Badge chip + accent outline on the service’s public card — e.g. ‘HIT’, ‘Promo’, ‘New’.”
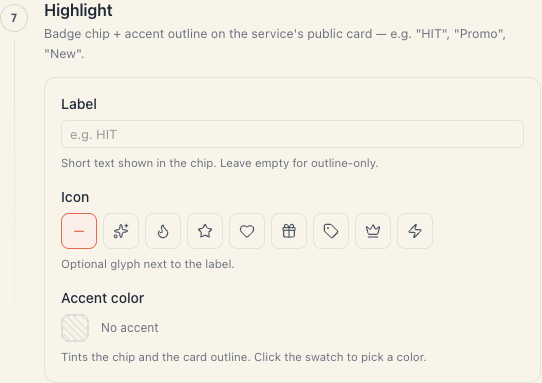
- Label — short text in the chip. “Leave empty for outline-only.”
- Icon — optional, eight choices (sparkles, flame, star, heart, gift, tag, crown, bolt) plus No icon.
- Accent color — “Tints the chip and the card outline.” There’s also No accent.
Purely visual. It does not affect price, availability or ordering.
8. What would you like to know about your client? — checkout questions
Section What would you like to know about your client?: “Pick which questions the customer answers when booking this service. Questions are shared across services.”
Each question is a row with a switch, its type (text, number, choice…) and a badge if it’s required. Below sit two buttons:
- Add field — creates a new question straight in the board library and enables it for this service.
- Manage fields — goes to Setup → Client questions, where they’re renamed and archived.
If the library is empty: “No fields defined yet. Add your first one below.”
Here you only switch them on and off. The questions themselves are board-wide — rename one and it changes everywhere. A required question blocks the client until they answer; the answers stay attached to the booking. See Client questions.
9. Resources & add-ons — the section that decides availability
Section Resources & add-ons: “The main resource and optional add-ons.” Get this wrong and the service saves happily, then shows clients “no available times”.
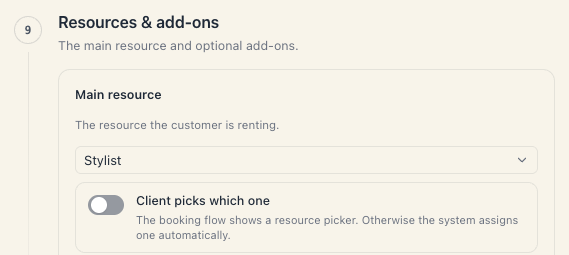
Main resource
The dropdown lists the board’s resource kinds with a count of bookable resources next to each: “Stylists · 3”, “Chair · 0”. That’s deliberate — you see the problem at the moment of choice.
- The choice is required. Without it the save fails with What this service needs / “This service needs at least one resource type to run, like a stylist or a room.”
- If the chosen kind has 0 resources, an amber hint appears immediately: “This kind has no active ‘Chair’ yet — the service won’t be bookable until you add at least one.” plus an Add Chair link that opens the new-resource form with the kind pre-selected.
- For a rental, people are excluded from the list — you rent a thing or a place.
Client picks which one
The switch Client picks which one: “The booking flow shows a resource picker. Otherwise the system assigns one automatically.”
Turn it on and a box appears — Resources customers can pick — with a chip per resource and a “3 / 5” counter. Switching on ticks all of them; you can untick some.
Mind the empty list. Untick every chip and the service becomes unbookable — the save fails with “When customers pick the resource themselves, you must allow at least one.” The list isn’t cosmetic: it is a real filter on who may perform the service. See Client picks the resource.
The switch stays greyed out while the kind has no bookable resources at all (its hint then talks about “at least 2”, though in practice one is enough).
Add-ons
Below the main resource sits the Add-ons block — “No add-ons yet. Add an optional resource — e.g. helmet, balls, equipment.” The Add add-on dropdown offers only kinds not already used.
This is where the one trap that costs hours lives: an add-on set to Always included (customer doesn’t see it) gates free times exactly like the main resource. It’s also the only way to make one service require two kinds of resource (a stylist and a chair). The whole mechanic is in Add-ons and extra resources.
10. Locations — only with two or more
The Locations section (“Restrict this offering to specific branches.”) is rendered only if the board has at least two locations. With a single venue this section simply doesn’t exist and the service is available everywhere.
- Available at all locations (on by default) — “When you add a new location later, this offering will be available there automatically.”
- Switch it off and a picker appears; the hint becomes “Pick exactly which branches it’s available at. Other branches won’t see it.”
Full detail — Which branches a service is offered at.
11. Saving, and what happens right after
Press Create offering (or Save changes).
The editor pre-checks nothing — it sends everything to the server and shows all the problems at once. When there are any, a panel appears above the form: Let’s fix a few things before saving with one row per problem (“N things need a quick change.”) and a Go to it link. The offending section gets a red ring and the same message inside it.
The most common messages and what they mean:
| Message | Cause | What to do |
|---|---|---|
| Service name | empty Name | type a name (up to 120 characters) |
| Duration | under 5 minutes | raise the duration |
| Price | fixed price with no value | enter a price (0 is fine after the confirm) |
| What this service needs | no Main resource picked | pick a resource kind |
| Who can perform it | an allowed resource was deleted or changed kind | re-pick the allowed resources |
| Payments not connected | deposit with no active payment connection | connect a provider or turn the deposit off |
| Deposit | a percentage deposit above 100 | lower the percentage or switch to a fixed amount |
| Locations | a chosen location isn’t on this board | re-pick the locations |
| Plan limit reached | the bookable-spots cap is exhausted | archive an unused resource or upgrade — Plan limits |
| Something needs a change | the generic “unexpected refusal” message | most often an inactive or archived location ticked in the Locations section — untick it |
On success:
- A toast: Offering created (or Offering updated).
- If the service is a group class, instead of success you get the warning Saved — but not visible yet with an Add a schedule button.
- Above the form a check runs — Checking availability… The result is either a green Bookable — next free slot: … or an amber N services will show clients “no available times” with the reason and a Fix link.
- On create, the address switches to the edit address — the next save updates the same service instead of creating a second one.
Changes apply to new bookings. Bookings already made keep the price and duration they were created with.
A short checklist for your first service
- Type: Appointment.
- Name: the way a client would say it.
- Duration: the real one, prep included.
- Pricing: Fixed price plus the amount.
- Resources & add-ons: Main resource = the kind your stylists live in.
- Create offering → wait for the green Bookable.
- Open your own public page and book yourself, to see the flow through the client’s eyes.
What’s next
- Pricing & day/time modifiers — the whole pricing chain.
- Add-ons and extra resources — “a stylist AND a chair”.
- Photos & details — the public card.
- Find out why a service shows no free times — when the check goes amber.